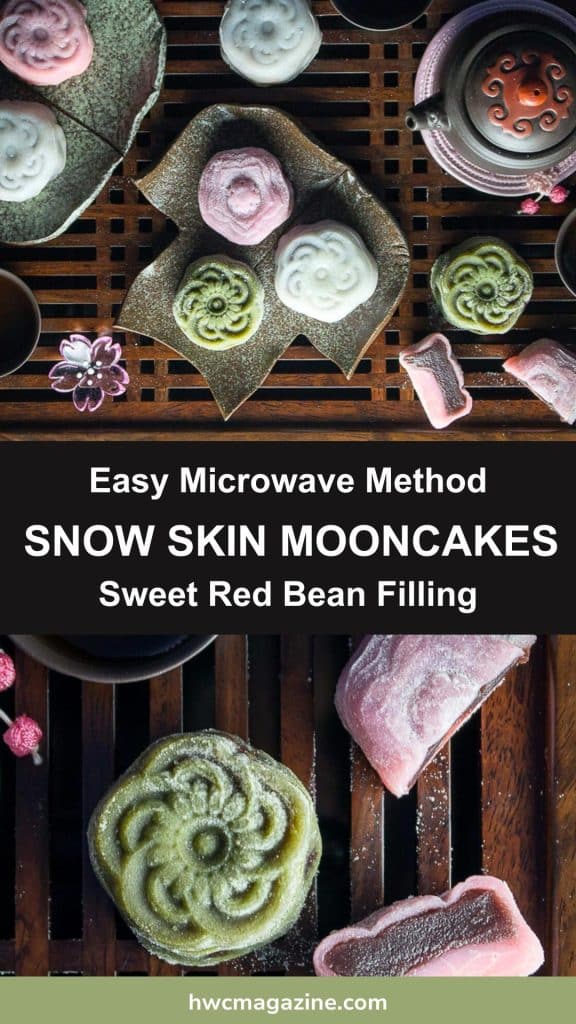
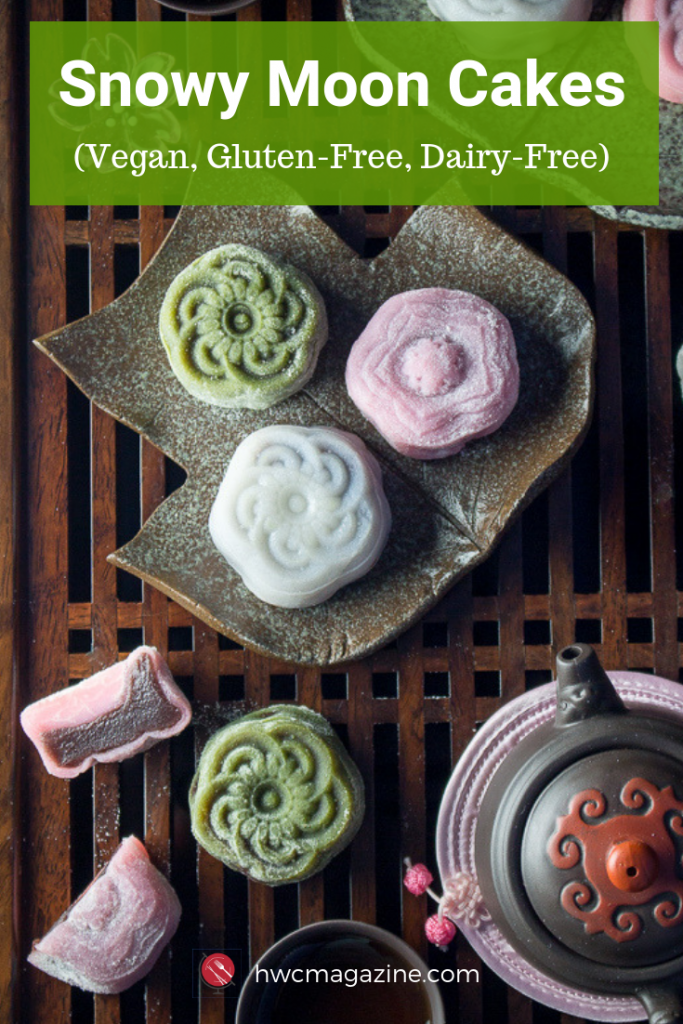
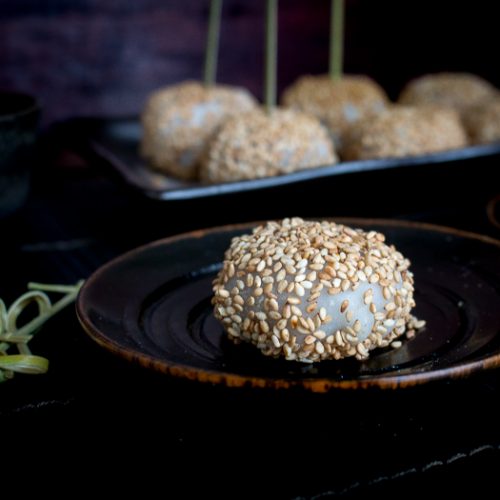
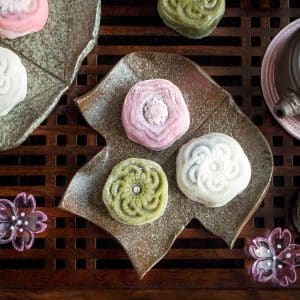
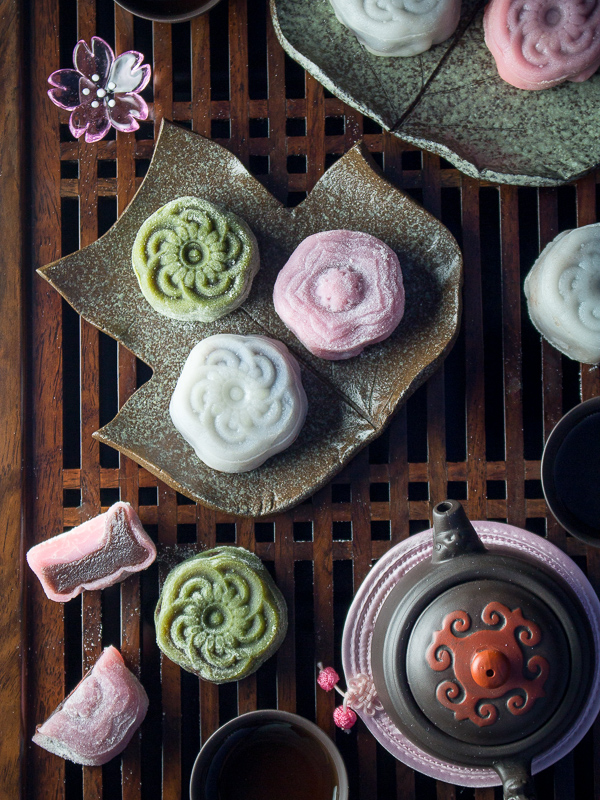
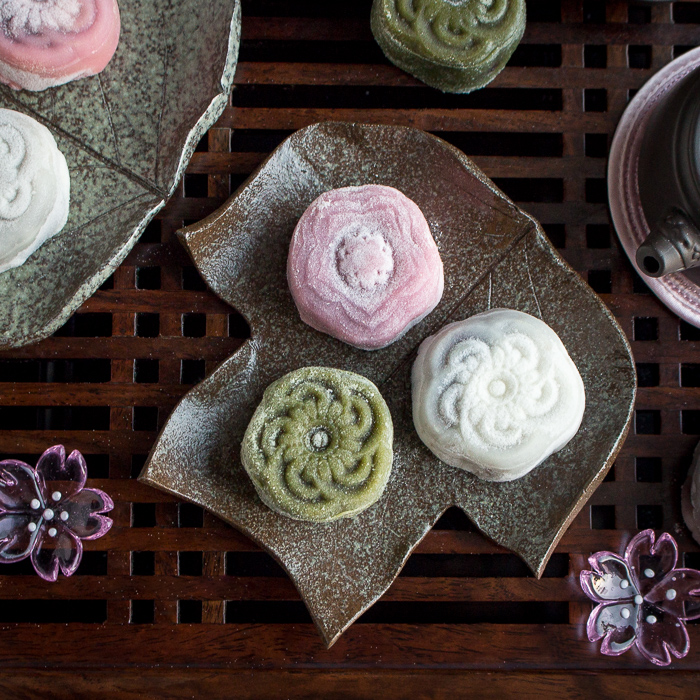
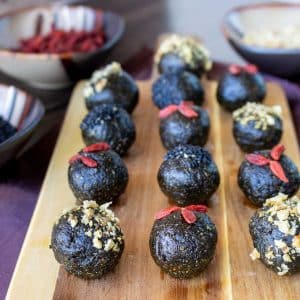
Craft your own beautifully decorated no-bake snow skin mooncake with our quick and easy 3-minute microwave mochi method. No steaming required! These snowy mooncakes are delicately soft, slightly chewy and stuffed with lightly sweet azuki red bean paste. These are not your average Mid-Autumn Festival mooncakes because they are also deliciously gluten-free, dairy free, and vegan too.
We can't wait for you to try this fun bite sized teatime Asian dessert. It's shaped like the moon and perfect for gift giving. The best part is you get to personalize your snow skin mooncake recipe with your own special flavorings and colors.
Whether novice or pro, this ultimate guide will show you foolproof steps and timesaving tips to make the best snow skin mooncake from scratch. Let's make and eat Mooncake!
Jump to:
- What is a Snow Skin Mooncake?
- Why Eat Mooncakes During Mid-Autumn Festival?
- Ingredients
- How to Add Color and Flavor to Mooncake Skin?
- Special Equipment
- Microwave Mochi Method
- Rolling, Stuffing and Stamping Mooncakes
- Expert tips
- Mooncake Filling Ideas
- What to share with mooncakes?
- Frequently Asked Questions (FAQ's)
- More Delicious Asian Treats
- Snow Skin Mooncake with Sweet Red Bean Paste
What is a Snow Skin Mooncake?
Are you prepared to embrace the emerging new mooncake trend? If your preferences align with ours, the conventional baked double yolk lotus stuffed mooncakes have truly lost their appeal. In all seriousness, the customary Cantonese-style store bought mooncakes resemble the Chinese equivalent of "holiday fruitcake"-a gift that keeps on giving!
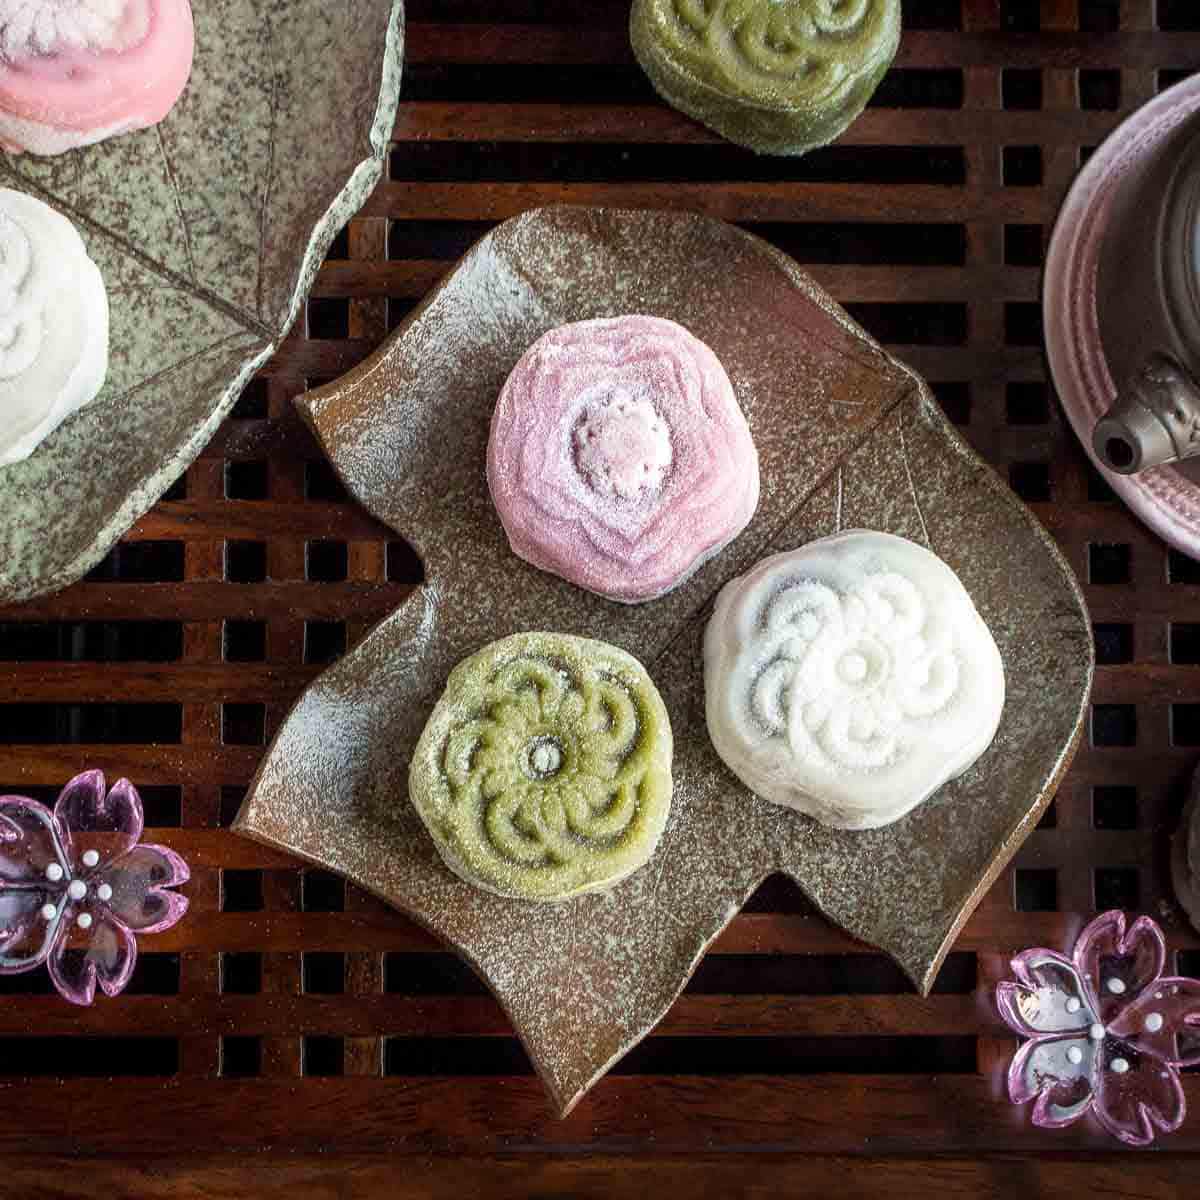
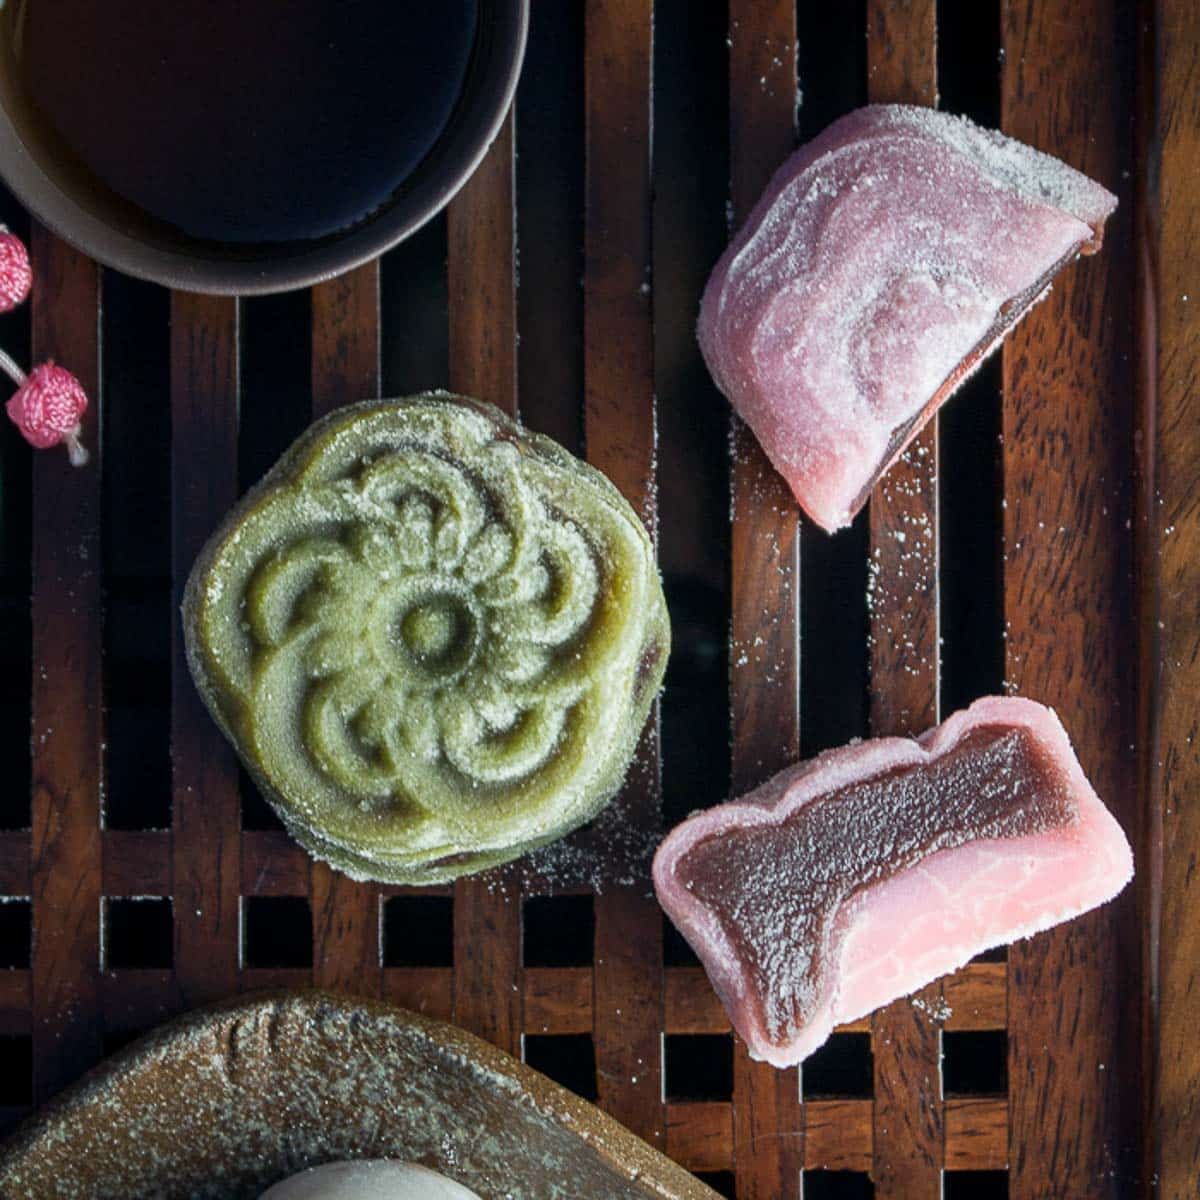
The term in Chinese for snow skin mooncake is Bīng Pí Yuè Bǐng (冰皮月餅). In this, Bīng translates to "ice", Pí signifies "skin", Yuè pertains to the "moon", and Bǐng stands for "cake". Snow skin mooncakes are sometimes also referred to as crystal, snowy or ice skin mooncakes because the outer layer is smooth, pillowy soft, and slightly translucent like snow. These non-baked mooncakes first originated in Hong Kong and now are enjoyed around the world.
This texture is very similar to mochi or our daifuku mochi recipe. In contrast to traditional baked mooncakes, snowy skin mooncakes possess an irresistibly chewy and soft consistency, courtesy of the inclusion of glutinous rice flour.
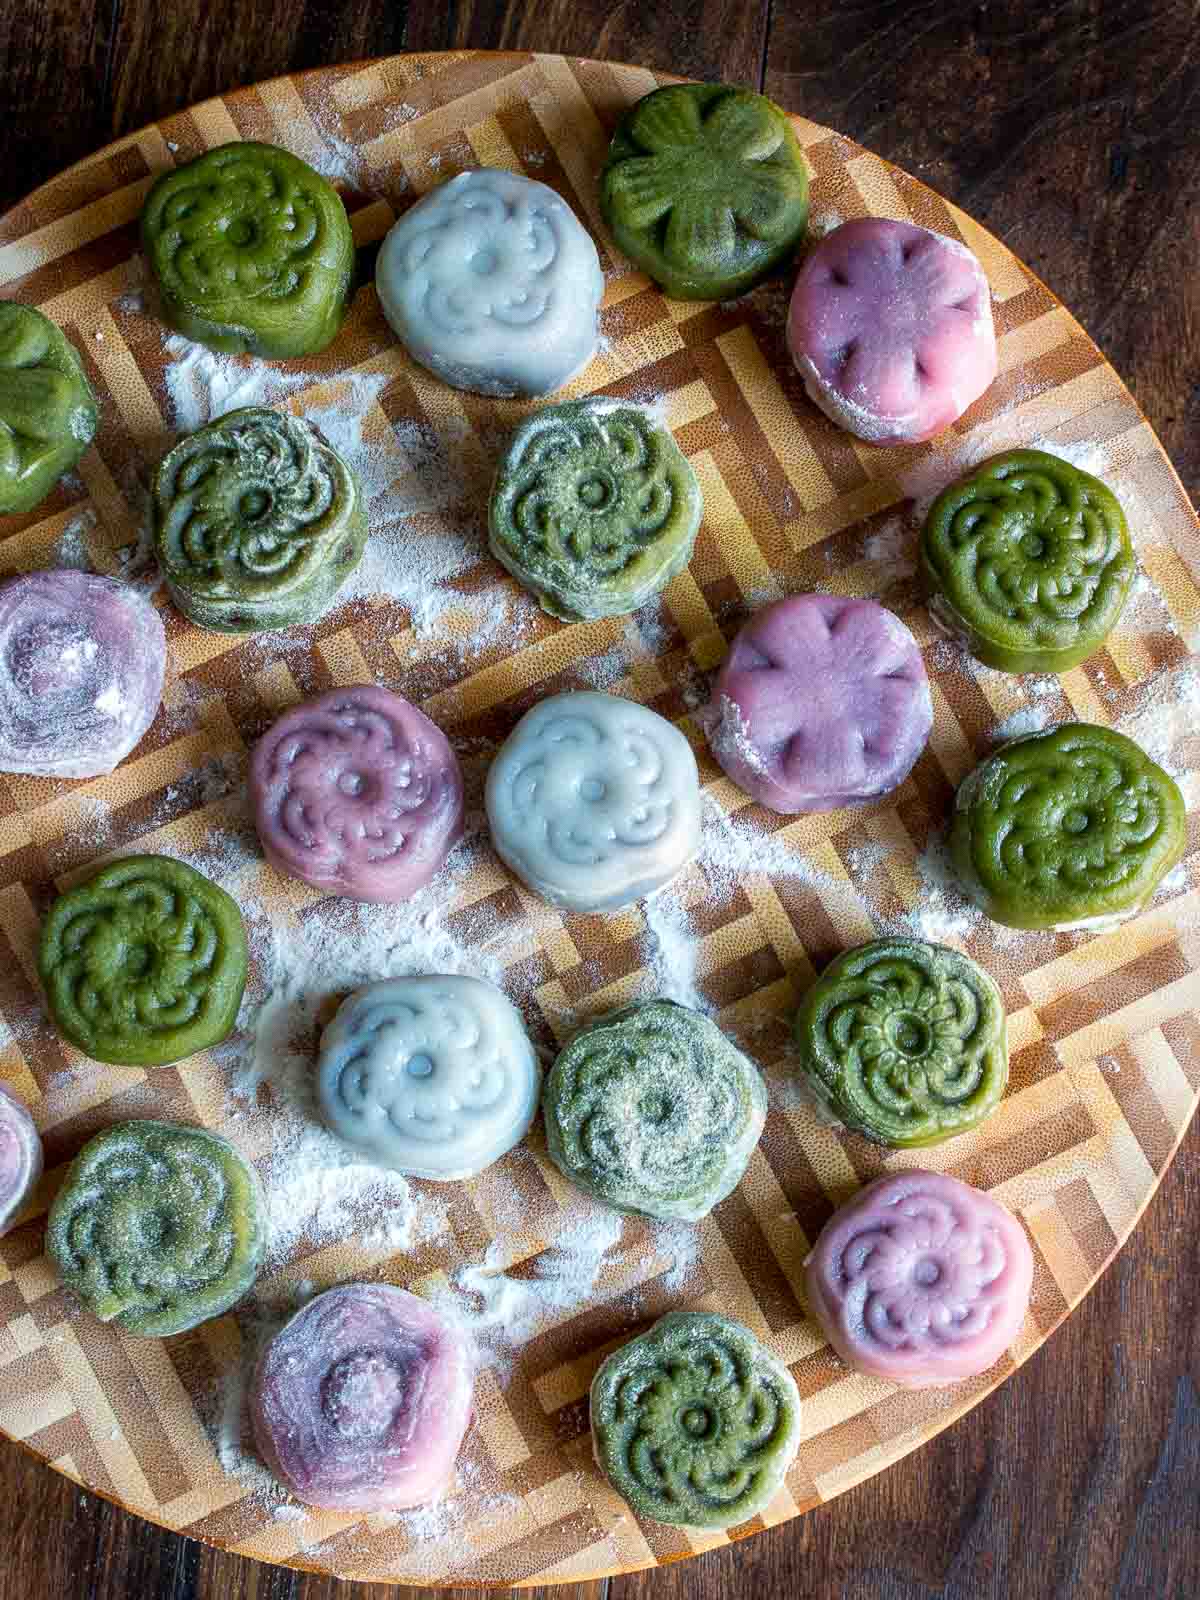
And that's not all - The inner filling has undergone a contemporary evolution, showcasing choices such as sweet custard, sweet red bean paste, black sesame, pandan, velvety chocolate fudge, and even indulgent ice cream. This array of diverse flavors and textures has garnered a global allure.
Why Eat Mooncakes During Mid-Autumn Festival?
Offering and gifting round cakes is part of Chinese tradition that symbolizes completeness and togetherness as a part of the fall harvest moon.
According to the Farmer's Almanac, the harvest moonrise comes right after sunset, it's big and bright and looks like you could reach up and touch it. The harvest moon allows farmers to work late to gather the bountiful autumn harvest and this is a reason to celebrate.
For many families, Mid-Autumn Festival is one of the most important holidays to share their love for each other by spending time together and enjoying mooncake desserts. Did you know that Mid-Autumn festival is also celebrated in Korea, Japan, Vietnam, Taiwan, Hong Kong, Singapore and around the world?
Maybe you can start your own tradition this year by making homemade mooncakes with family and friends. Once you try a snow skin mooncake with sweet red bean paste, the sweet flavor and addictive texture will make you long for more. Now that you know why we eat mooncakes, let's gather the supplies to make the best gluten-free and vegan mooncakes.
Ingredients
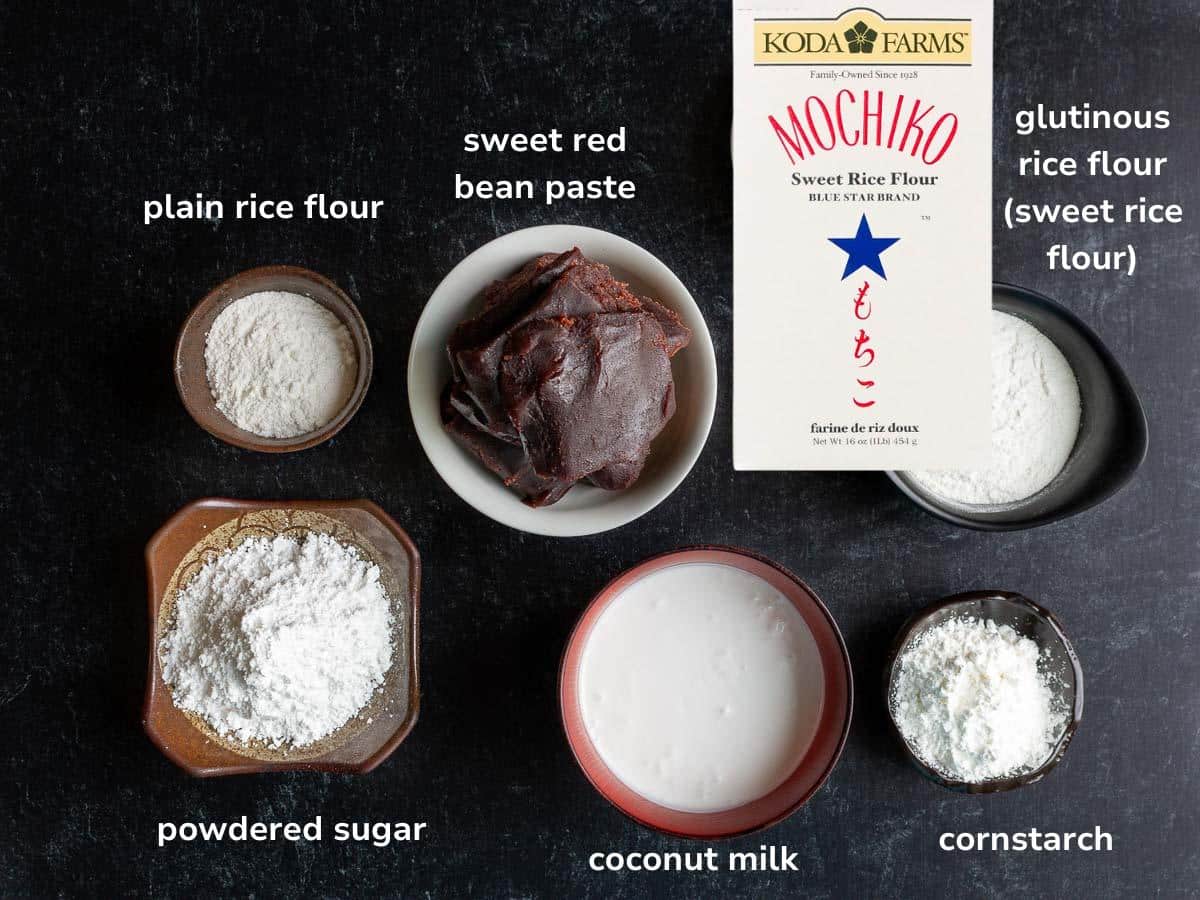
Glutinous Rice Flour is flour made from short grained glutinous rice, sometimes also called sticky rice or sweet rice. This special ingredient gives snow skinned mooncakes their addictive chewy mochi-like texture as well as other Asian desserts like glutinous rice balls for Tang Yuan, black sesame mochi donuts, and Chinese New Year Cake.
Regular Rice Flour is plain rice that has been ground to a fine powder.Rice flour provides a different type of starch and protein content compared to glutinous rice flour. This can contribute to the stability of the dough's structure and prevent it from becoming overly sticky or gummy. It helps maintain the mooncake's shape and texture.
Corn Starch or potato starch play an important role in keeping the texture of the snow skin mooncakes soft, chewy, reduces excessive stickiness, and prevents the mooncakes from getting hard. Argo corn starch is gluten free, but some cornstarch brands are not.
Powdered sugar gives the skin of the cakes a light sweetness while maintaining the soft and chewy texture.
Coconut Milk from a can provides 3 distinct purposes. Initially, it maintains the dairy-free and vegan nature of this recipe. Furthermore, it imparts a delightful coconut essence. Lastly, it introduces a touch of natural oil, enhancing the smooth consistency of the mixture. This makes the mooncake dough pliable and reduces the likelihood of adhering to the molds. We used Thai Kitchen's full fat coconut milk in a can.
Sweet Red Bean Paste, also called anko, is a lightly sweet paste made with azuki beans and has the texture of a soft fudge. It can be made at home if you are feeling ambitious. To save time, you can buy a gluten-free and vegan remade red bean paste at an Asian food market, specialty market or even on Amazon.
How to Add Color and Flavor to Mooncake Skin?
This is the million-dollar question of the day! And the answer is… whatever your little heart desires. Here are some potential additions you can make to the mooncake skin recipe to add a pop of color and flavor.
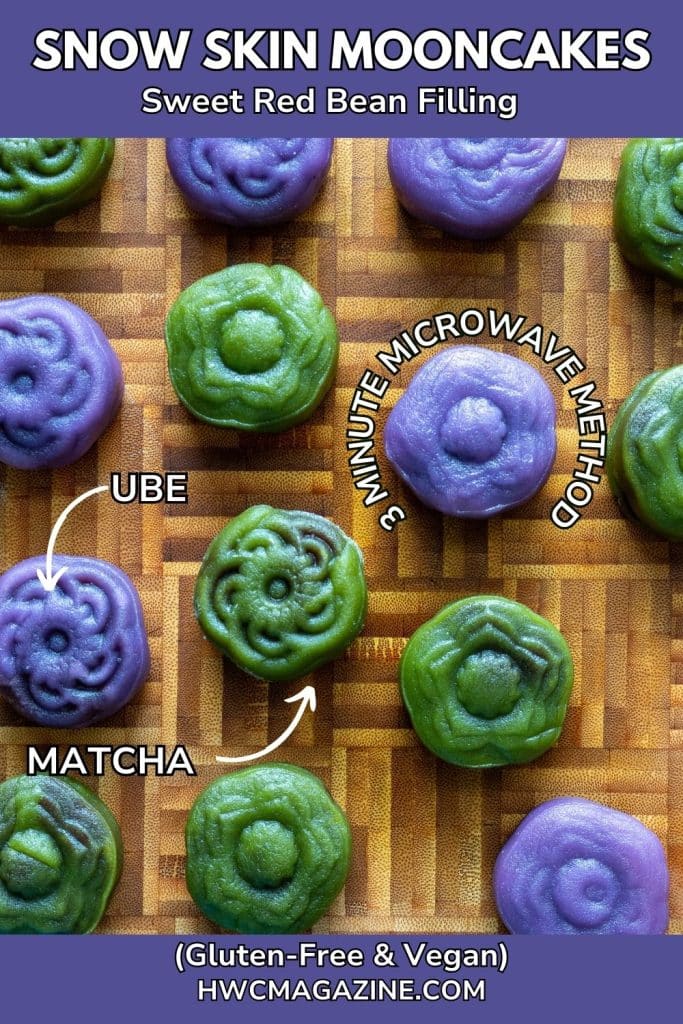
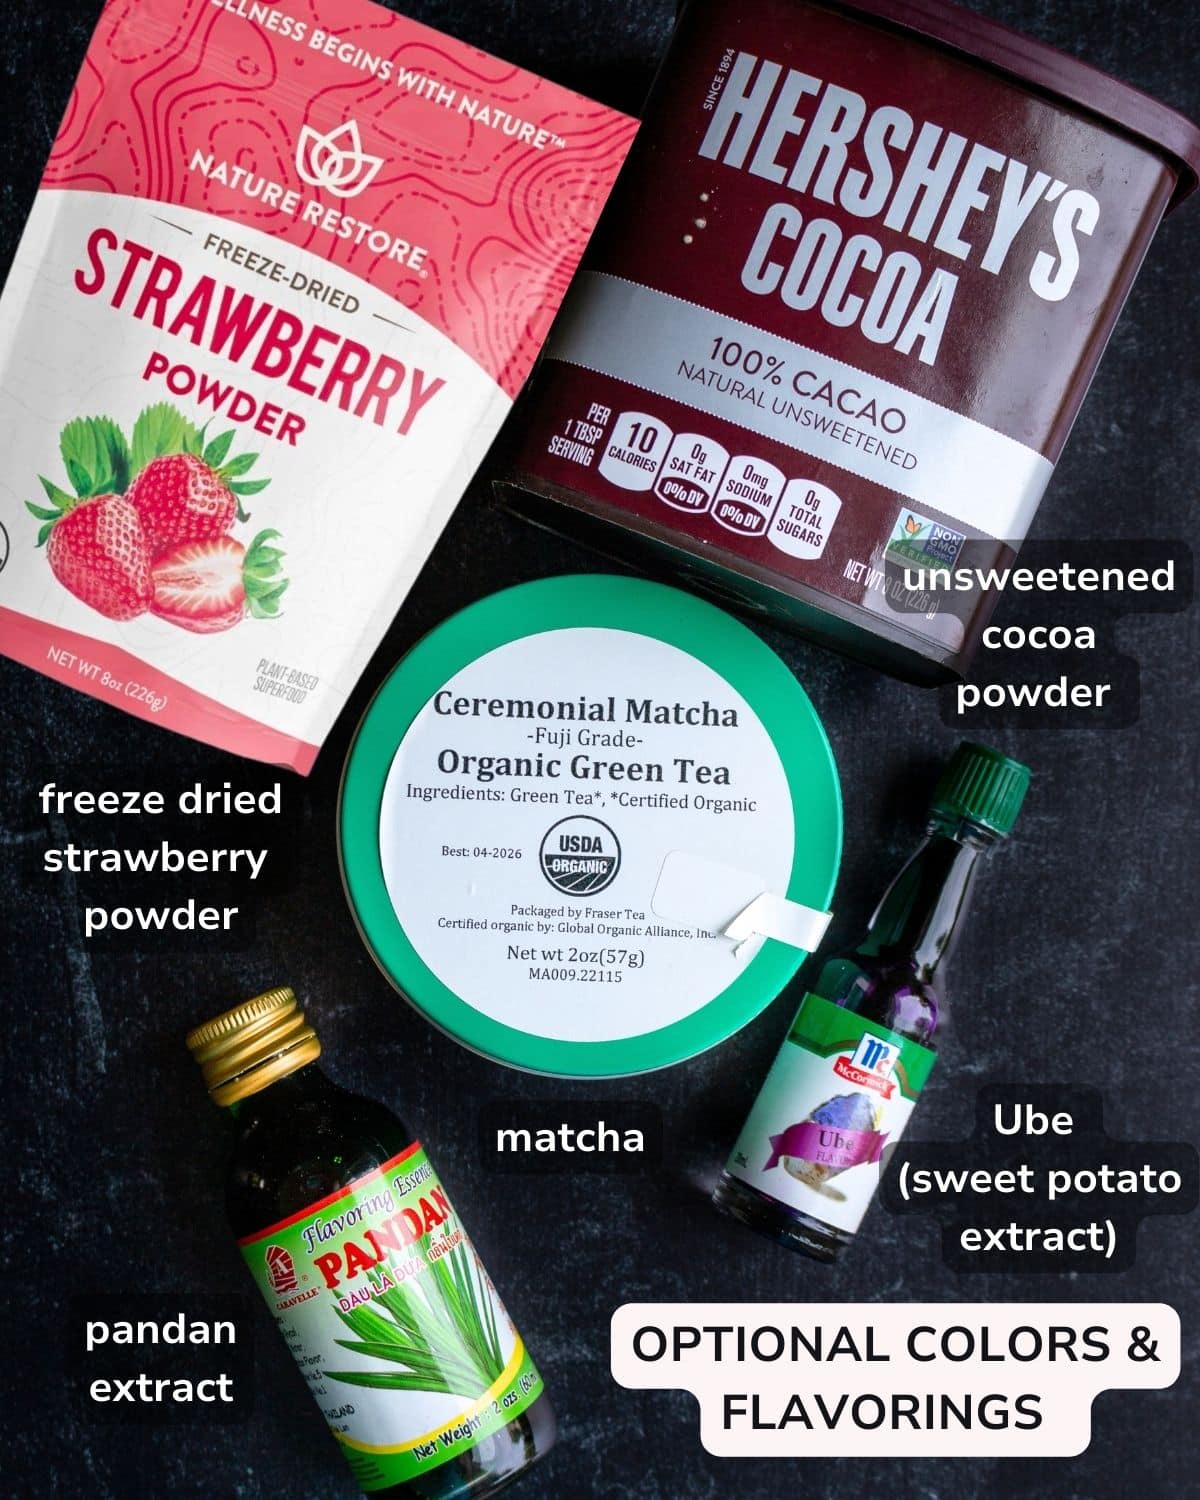
- Matcha tea powder (green) - earthy grassy fresh flavor that pairs well with sweet red bean paste and is also delicious in our Matcha nice cream recipe.
- Ube extract (purple) - this is a light sweet potato flavor.
- Concentrated Pomegranate or cherry juice (pink)
- Cocoa or cacao powder (brown) - sometimes we even add a little to the sweet bean paste filling to make it taste like fudge.
- Pandan extract (green) has a tropical grassy vanilla flavor.
- Vanilla extract (pale beige)
- Turmeric powder (yellow) and has a warming earthy flavor.
- Lemon or Orange Citrus zest - add little specks of yellow or orange and a lovely fresh aroma and flavor.
- Butterfly blue pea tea powder (blue) does not have any flavor but sometimes can turn lightly purple or even light aqua when used in a recipe due to the pH changes.
- Ground freeze dried strawberries (pink)
- Concentrated blueberry juice (purple).
- Floral extracts like lavender, rose or jasmine for aroma but the color will remain a translucent white.
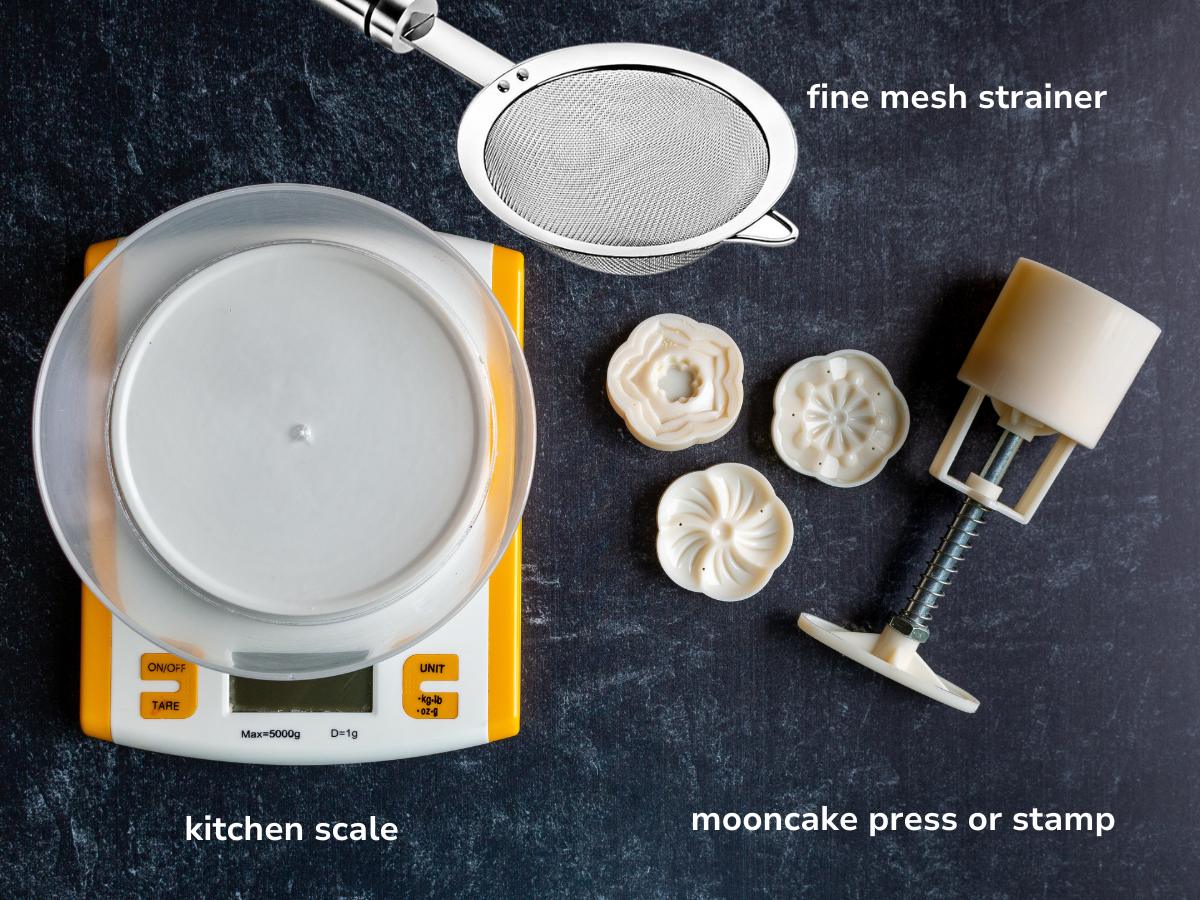
Special Equipment
For this snow skin mooncake recipe, you will need a Fine Mesh Strainer, used to remove any lumps in the cake batter. In addition, you will also need a kitchen scale and mooncake mold or stamp. If you do not have a microwave, you can cook the mooncake dough low and slow on the cook top.
Kitchen Scale
While it doesn't need to be extravagant, having one can be immensely beneficial if you're aiming to create the finest mooncakes. The approach you and I employ to fill a cup with flour might vary, leading to differing amounts. Yet, a scale remains impartial. This holds true even considering the variations in measuring cup sizes across the globe.
Were you aware that a Japanese cup amounts to 200 ml, whereas a US cup is 236 ml? Surprisingly, we weren't either. Upon relocating to Japan, our baking endeavors faced setbacks, leaving us puzzled. We considered factors like elevation disparities or water quality, but the actual culprit turned out to be the measuring cup itself. Who could have guessed?
Mooncake Molds
There are 3 basic types. You can find mooncake molds or stamps, sometimes also called cookie cutters at Asian food stores, specialty bakeries and easily online on Amazon.
- Traditional Wooden Mooncake Molds usually have 2 to 3 intricately carved molds on a wooden board. The designs on the wooden molds may have a cultural significance or stamp that is representative of that region.
- Two-Piece Mooncake Molds have two pieces that hold the mooncake together and the flat section to make the design. They generally are made from plastic or silicon.
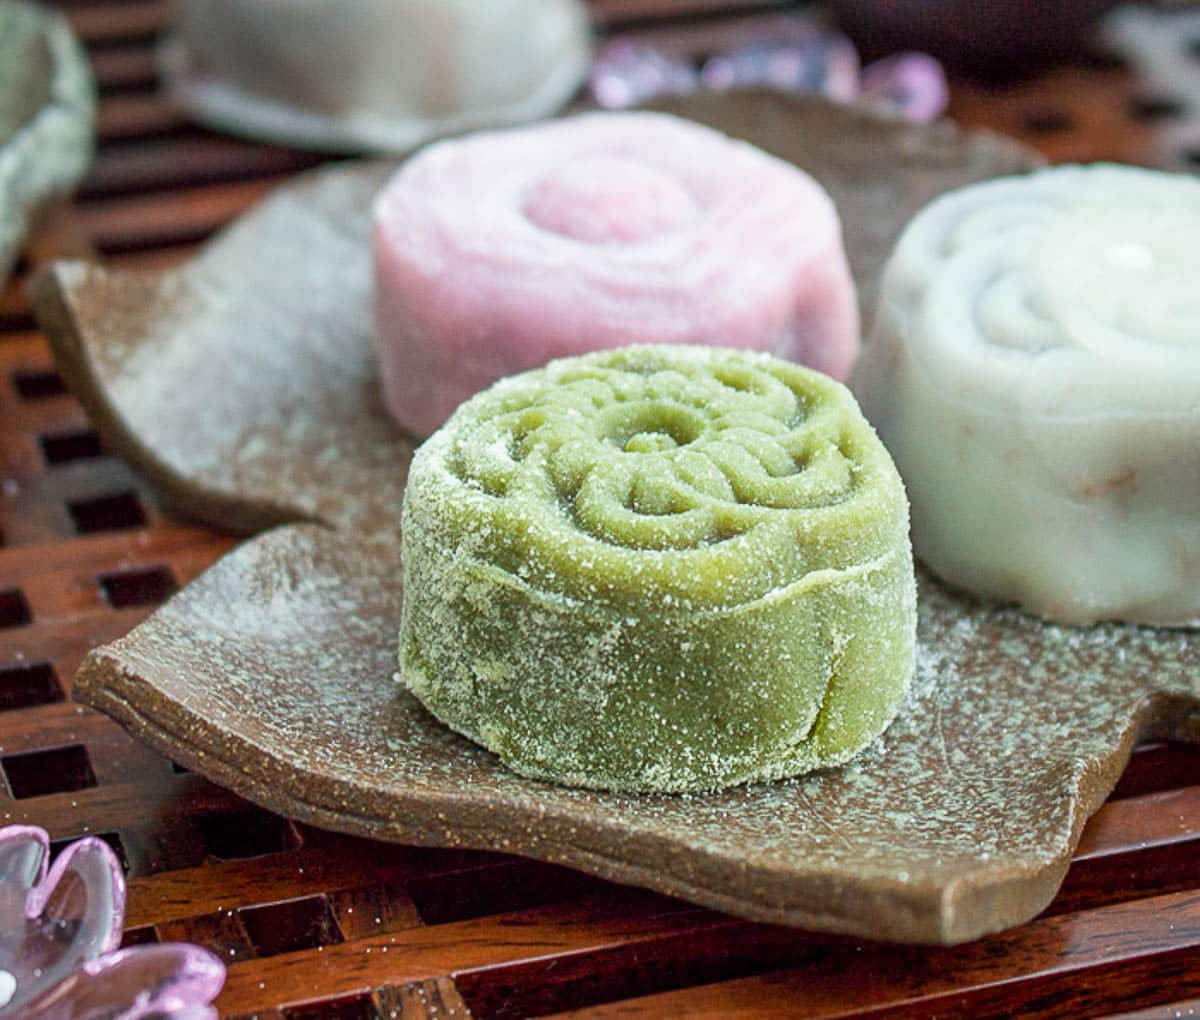
- Stamp Mooncake Molds consist of three primary components: a cylindrical tube to contain the mooncake, an ornamental plate responsible for crafting intricate designs, and a plunger that embeds the decorative pattern into the cake. While in Hong Kong, we were introduced to the art of mooncake-making using the stamp-style apparatus-an approach that's not only user-friendly but also exceptionally reliable.
Microwave Mochi Method
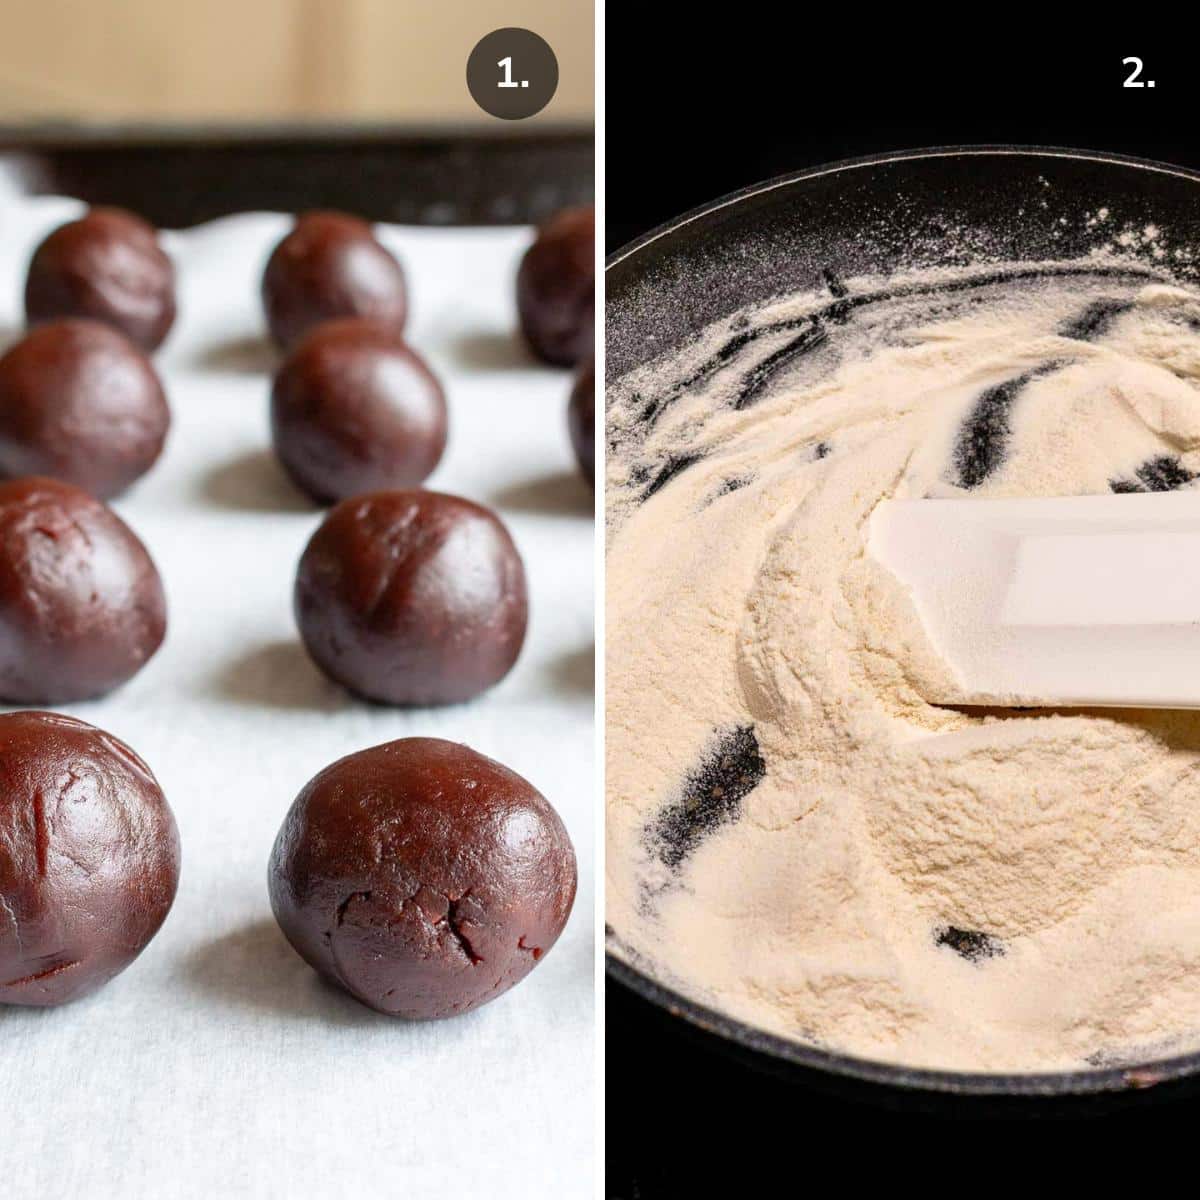
- Weigh out 28 grams of sweet red bean paste and roll into a ball. Continue this process to make a total of 16 balls. Place the balls on a lined cookie sheet and freeze while you make the mooncake skins.
- Cook a little glutinous rice flour on the stovetop until it's pale yellow to get rid of the raw flour taste. We use this cooked glutinous rice flour to prevent the mooncake dough from sticking on the kneading board or inside the mooncake molds. Alternatively, you can skip this step and use a tiny bit of cornstarch or potato starch to prevent the dough from sticking.
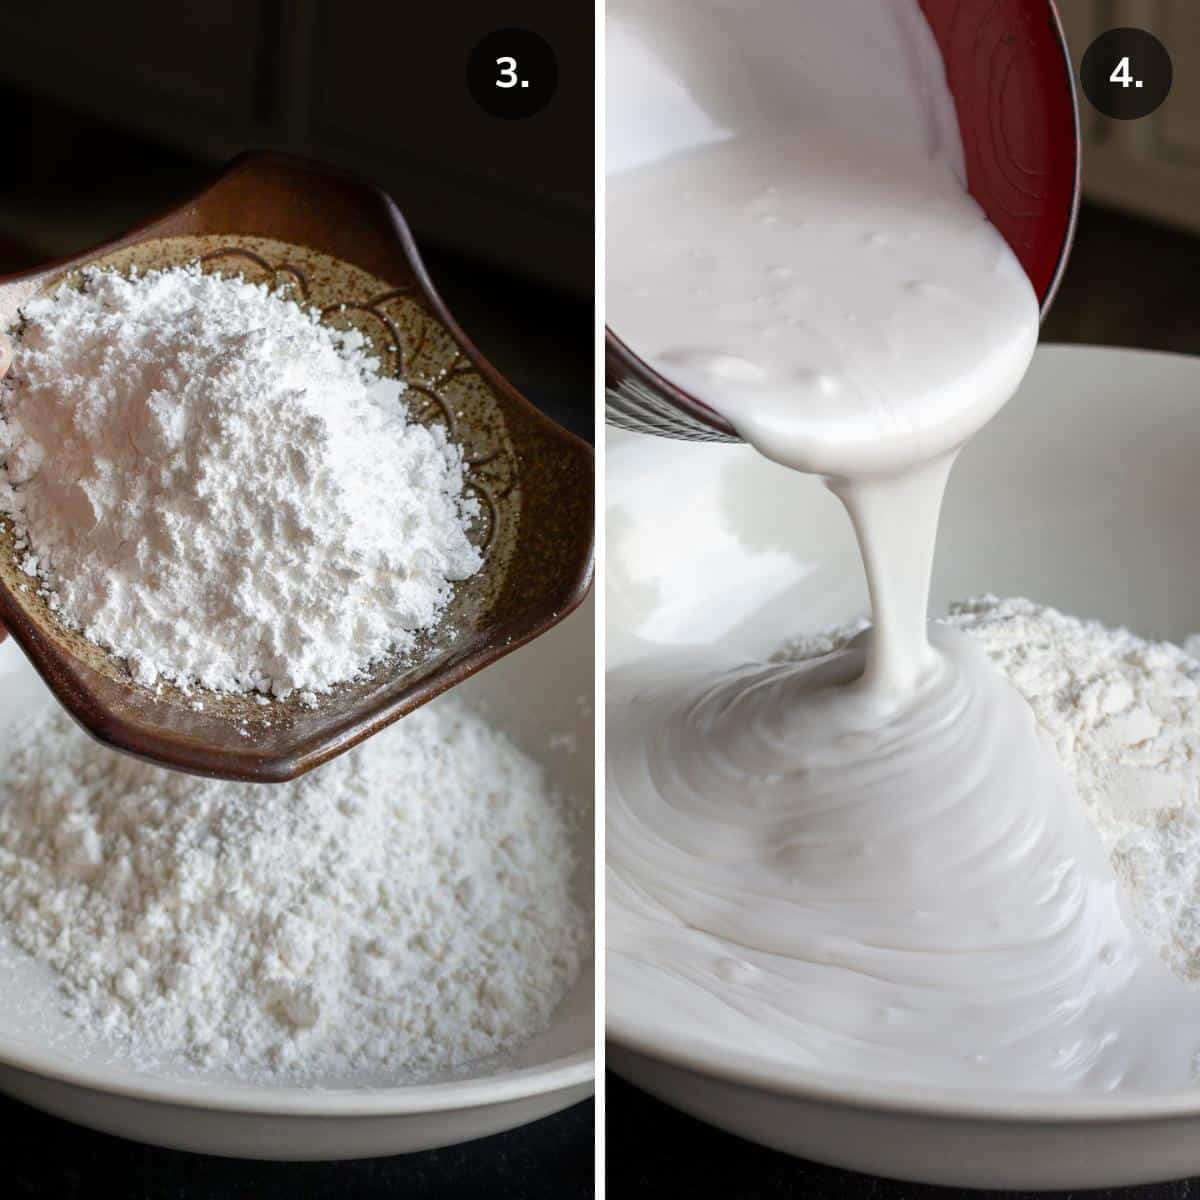
- Measure the dry ingredients; glutinous rice flour, plain rice flour, cornstarch or potato starch and powdered sugar and add them to a large microwave safe bowl.
- Add in coconut milk and mix until well incorporated.
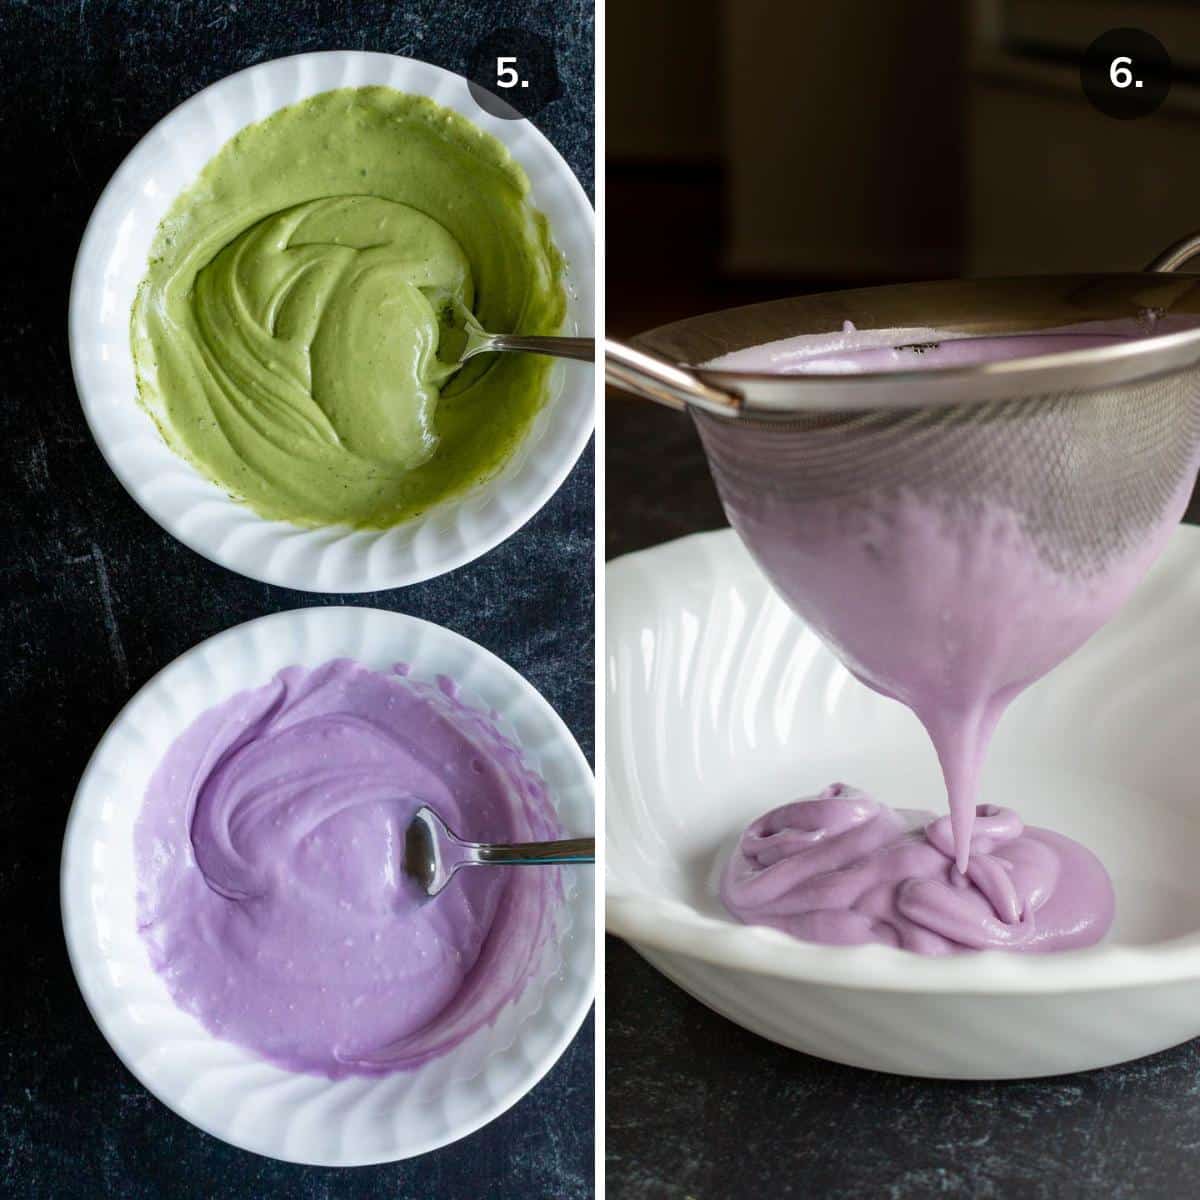
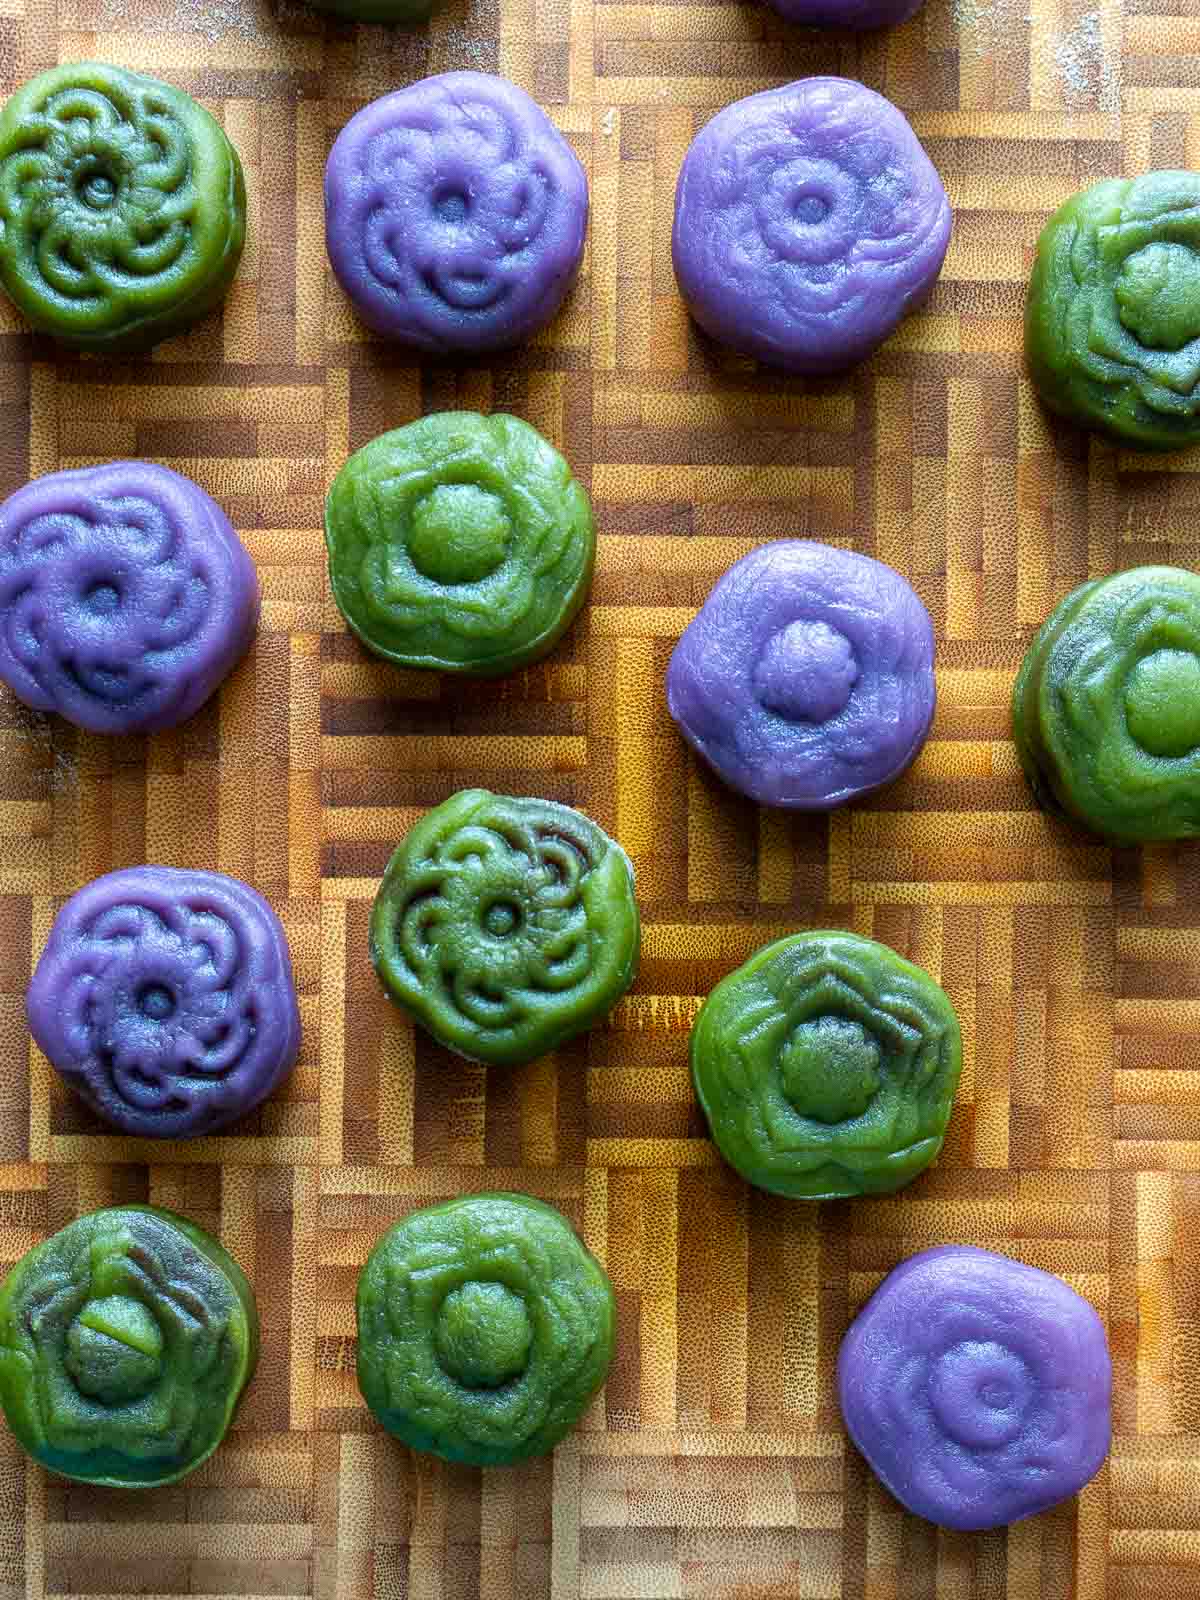
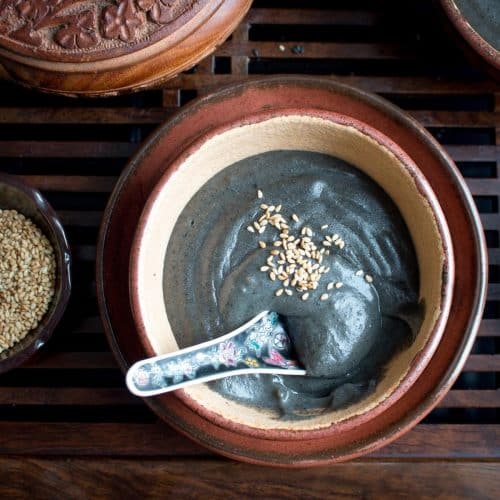
- If you wish to add color or flavoring to your mooncake skins, do this now and mix well. We split the mixture in half and added 1 teaspoon of matcha tea powder (green) to one bowl and a couple of drops of Ube extract (purple) to the other bowl of cake batter.
- Strain the cake batter through a fine mesh strainer.
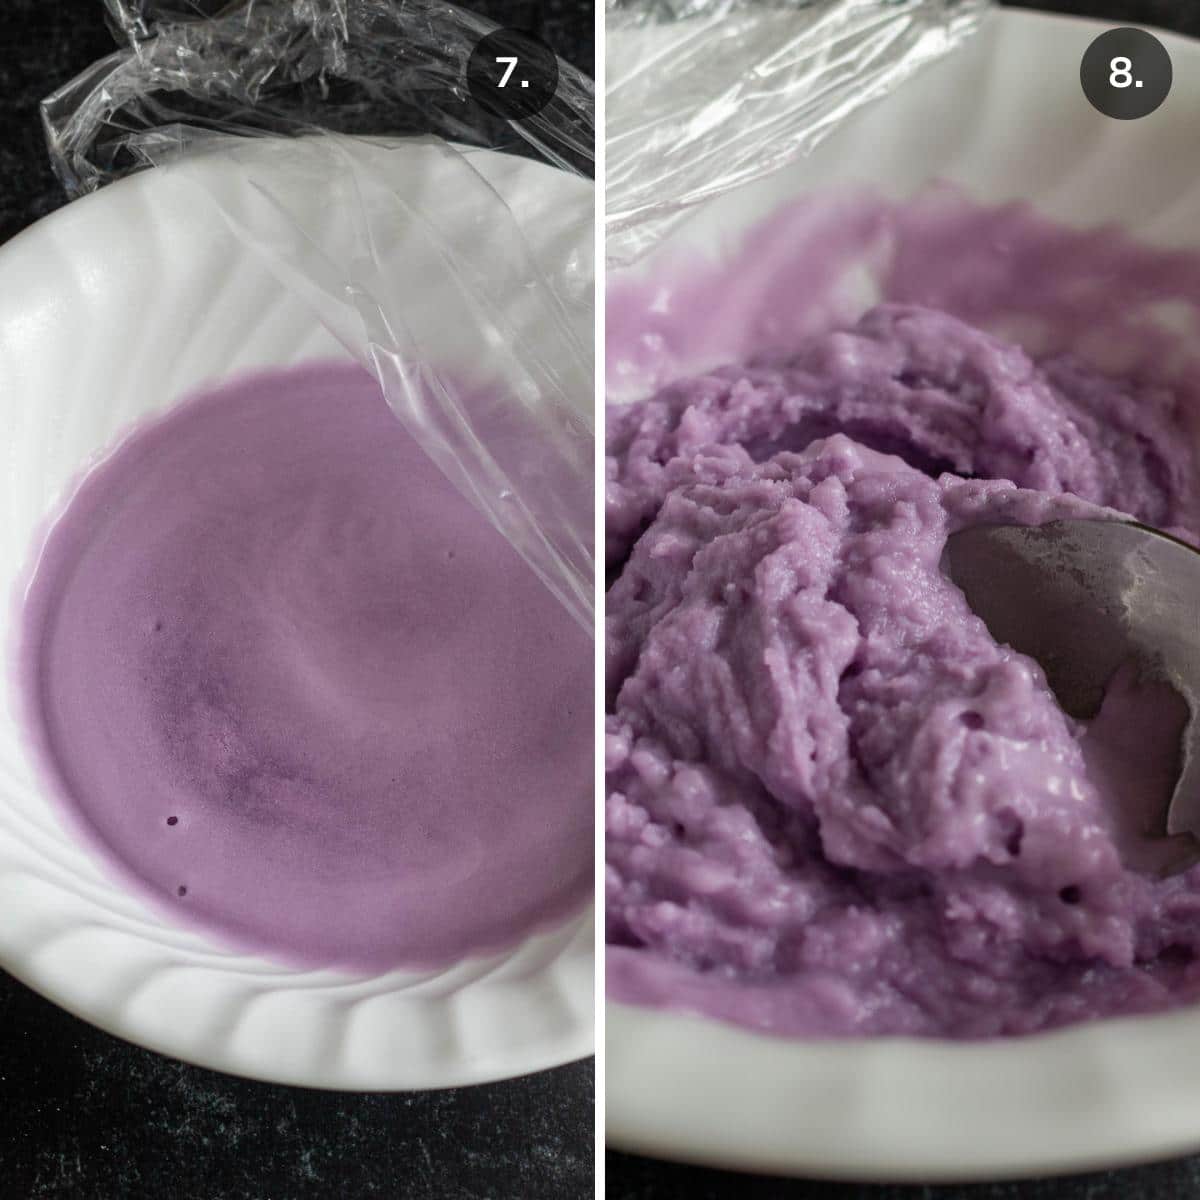
- Cover the bowl loosely with plastic wrap and microwave on full power for 30 seconds. Carefully pull back the plastic wrap and stir well. Cover the bowl lightly again with plastic wrap and microwave for another 30 seconds and stir well. Do this procedure 4 more times for a total of 3 minutes or until it turns translucent. If you decide to split the batch in half to add colors, you will need only 2 minutes in the microwave.
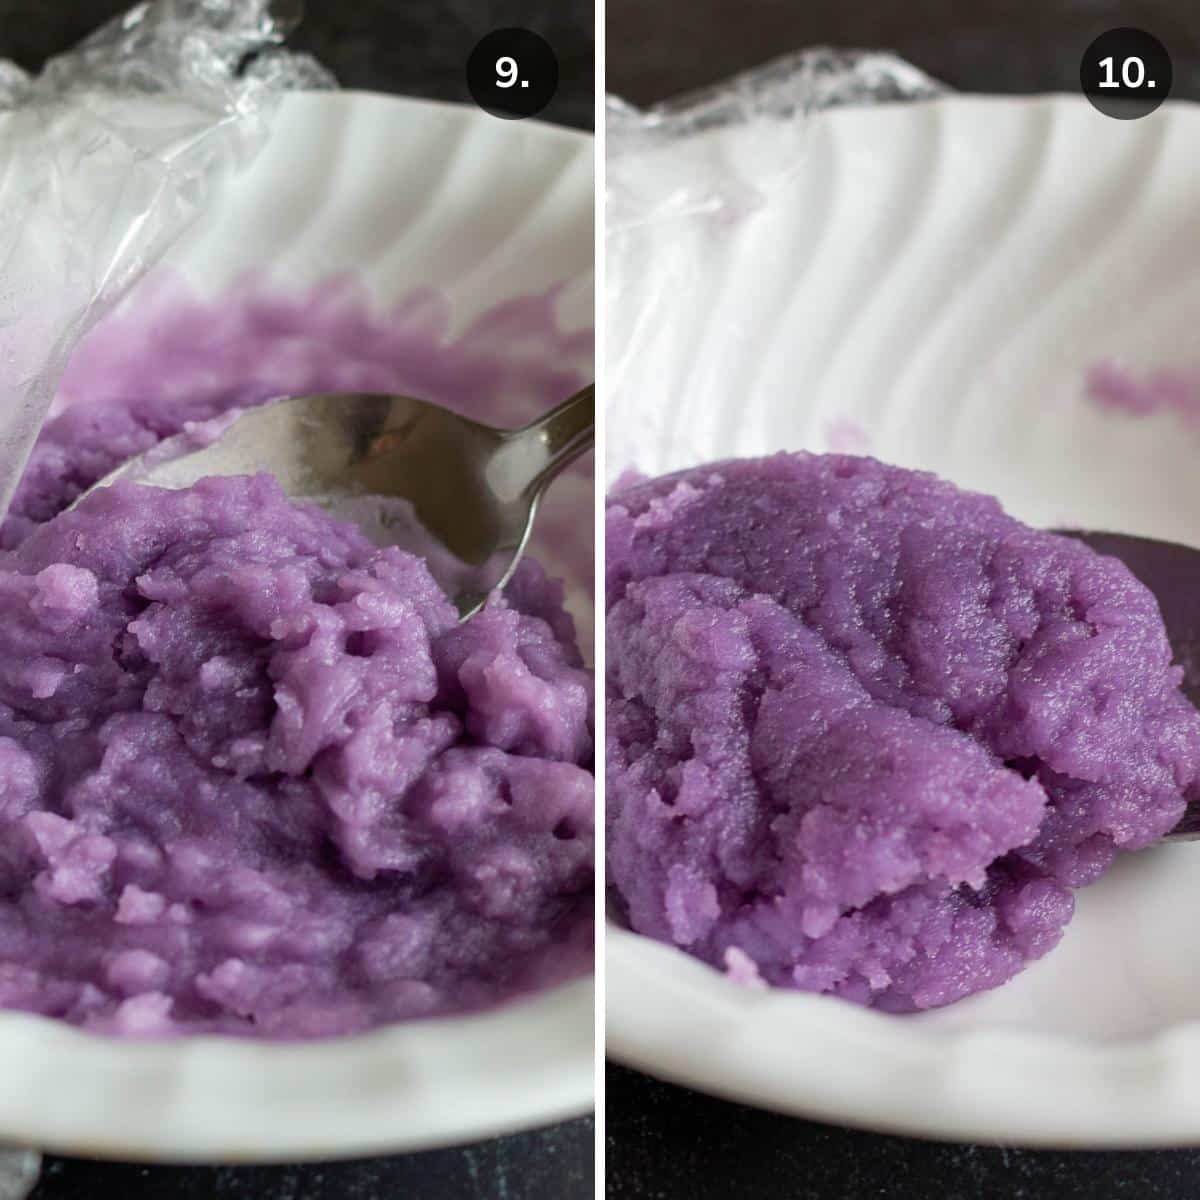
- Remove the cooked mooncake dough from the microwave and allow it to cool. You can place the microwaved mixture in the refrigerator for a few minutes to speed up the cooling process. Using the microwave makes this recipe for snow skin mooncakes and even our chocolate pudding so quick and easy.
Rolling, Stuffing and Stamping Mooncakes
Now comes the fun part! Be sure to check out our video, located in our recipe card below, so you can see this in action.
- Remove the sweet red bean paste balls from the freezer.
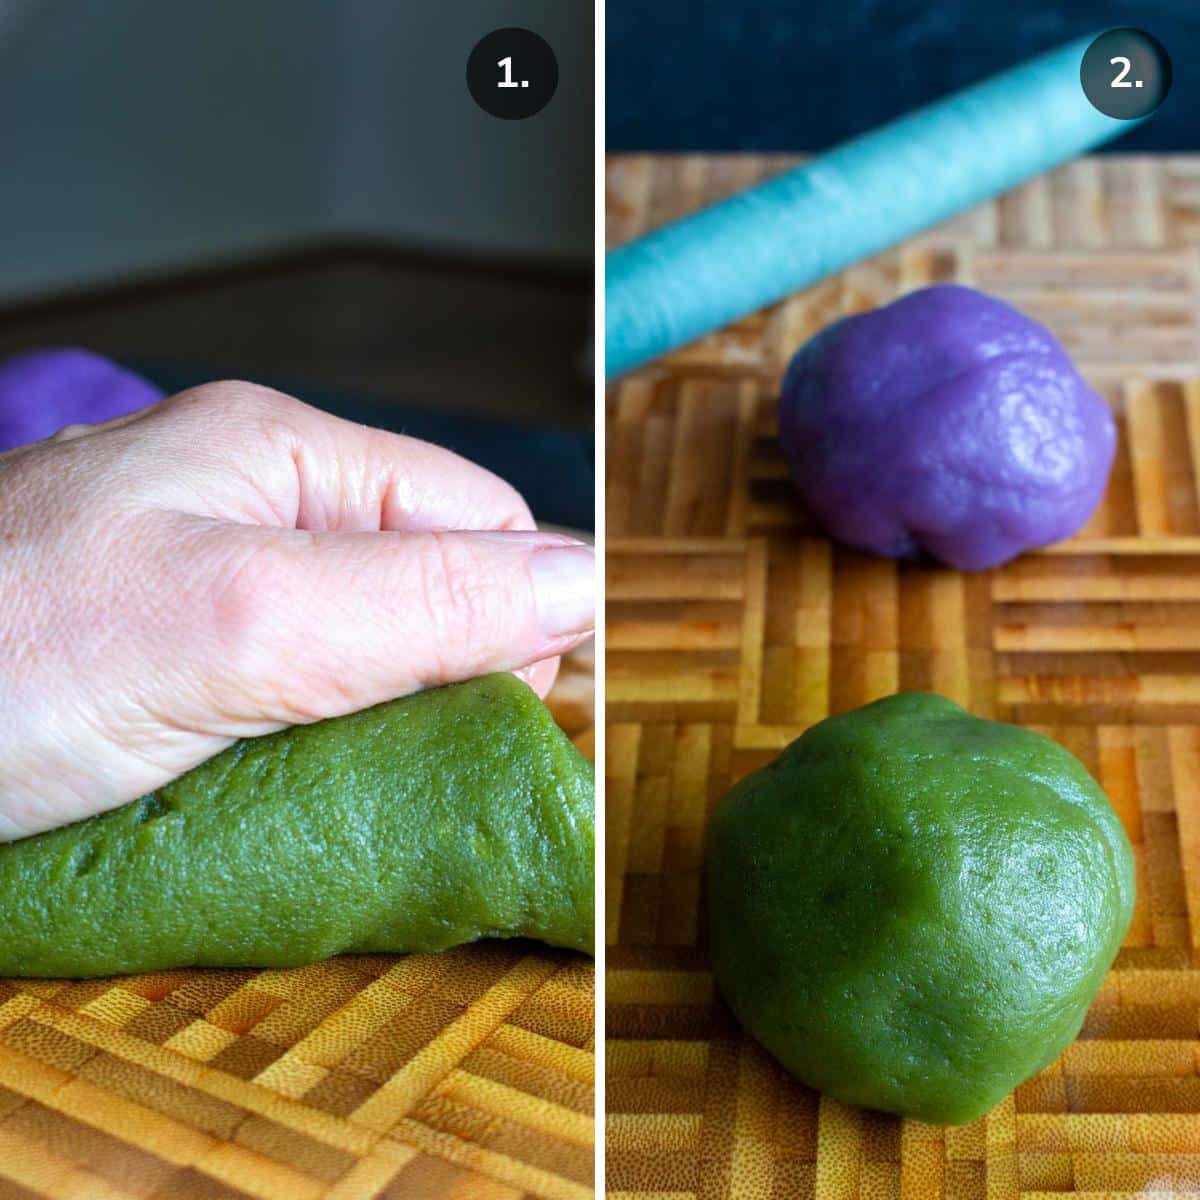
- Sprinkle a little cooked glutinous rice on your board to prevent sticking. Knead the mooncake dough for about 5 minutes or until smooth and glossy. Then form it into 2 balls.
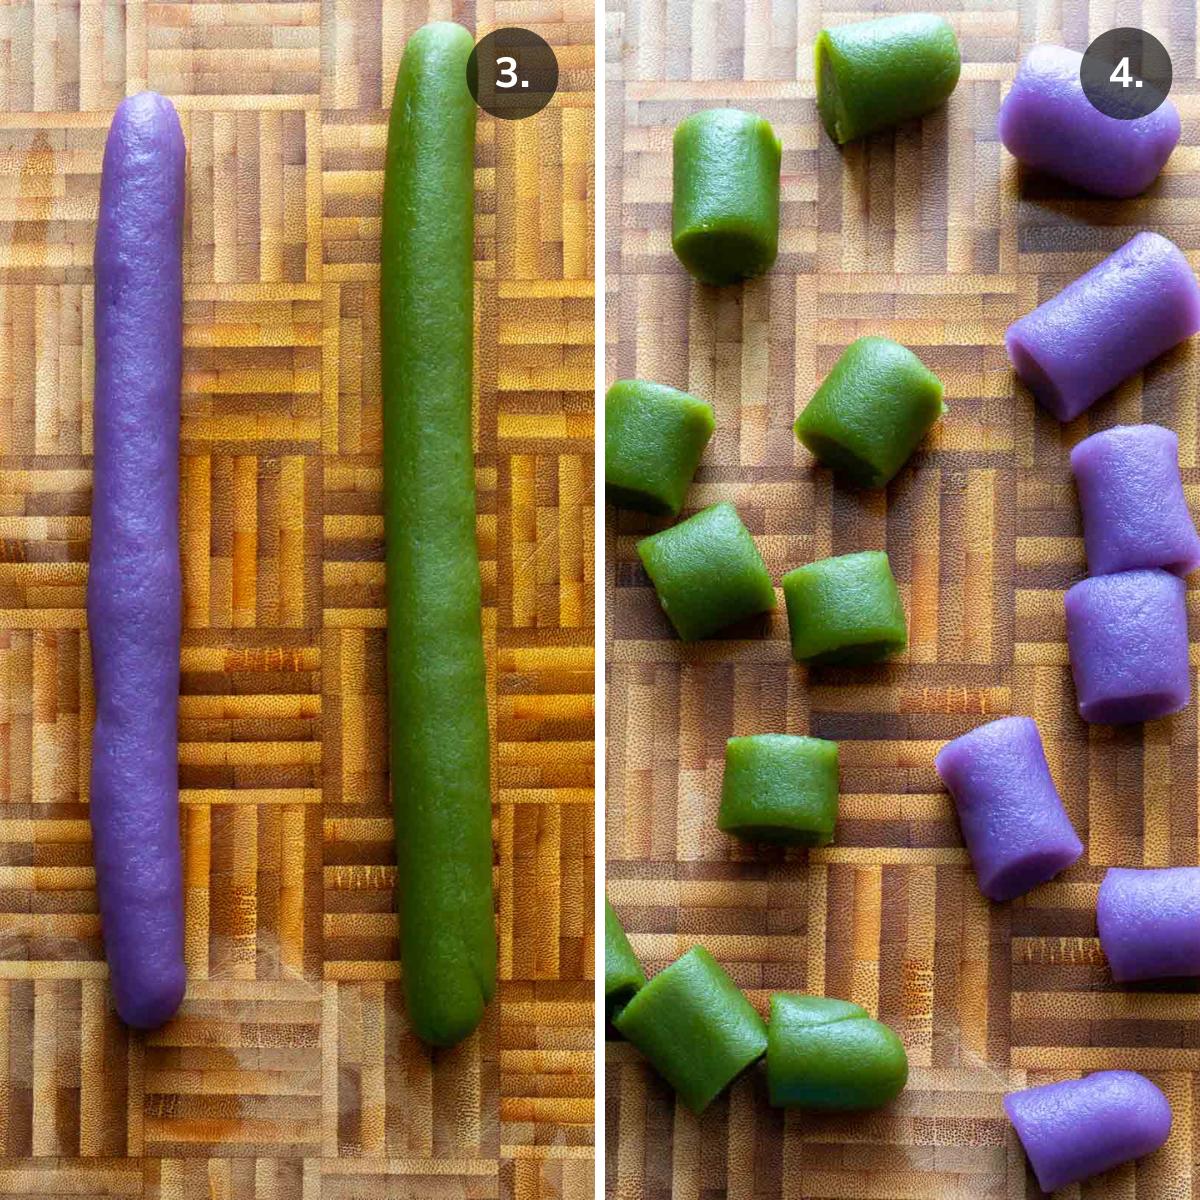
- Roll the balls back and forth on the board to form 2 ropes. Cut each rope into 8 sections for a total of 16 cubes of dough.
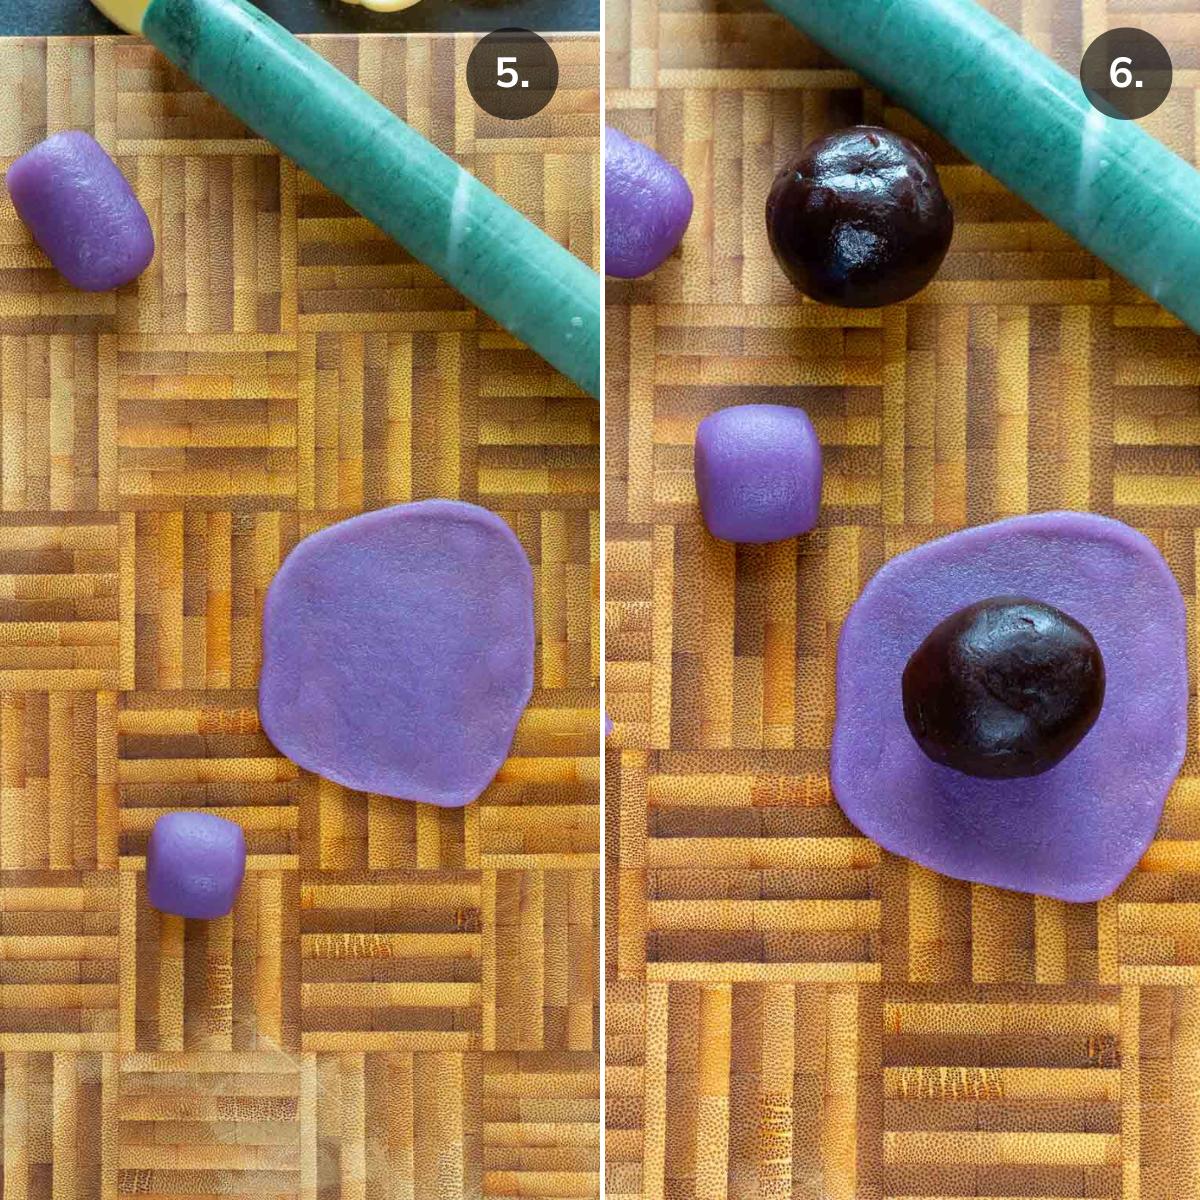
- Place one cube in your hand and roll it into a ball. Then use a rolling pin to roll out the dough to approximately 3 inches in diameter.
- Set one sweet red bean paste ball in the center of the dough. Use your fingers to gently gather the dough to the top and pinch to close. Roll the stuffed mooncake in your hands lightly to smooth it out.
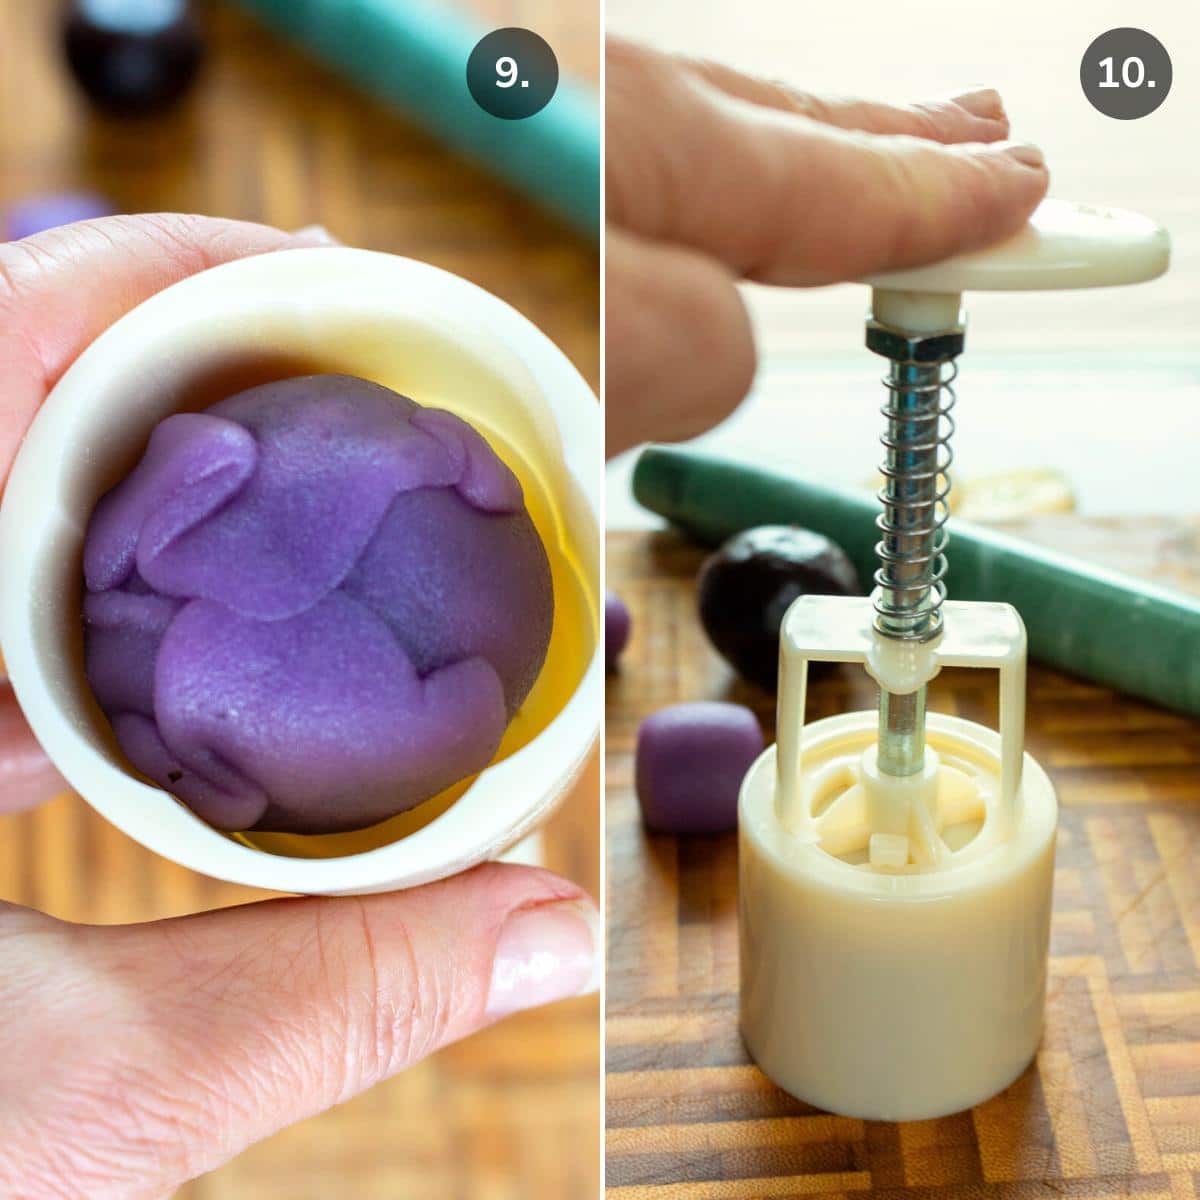
- Lightly dust the inside of the mooncake mold or press with a little of the cooked glutinous rice flour or cornstarch. Shake out the excess.
- Place the stuffed mooncake smooth side down into the mooncake mold. Invert the mooncake mold so that the handle is facing upwards, and the cylindrical tube that contains the mooncake in touching the board. Press the stamp down firmly but carefully to transfer the beautiful design onto the snow skin mooncake.
- Carefully lift the stamp. Your delicious snowy mooncake is ready to eat!
Expert tips
- Weigh your ingredients! It is best not to use the US cups and measuring technique for this recipe for snow skin mooncake because it is not reliable.
- Wearing gloves is helpful when working with a sticky mochi consistency dough.
- Use as little of the cooked glutinous rice flour or cornstarch as possible to prevent sticking. If you use too much, it can take away from the aesthetic beauty of the mooncake design.
- Full fat coconut milk is best for this recipe. It provides the flavor and the essential oils to keep the mooncake skin soft and supple.
- Keep the center thicker than the edges, when rolling out the mooncake dough. This helps keep the shape of the mooncake.
- Use a small 50-gram mooncake stamp to keep portion sizes under control or cut into wedges to share. This size stamp will make 16 mooncakes.
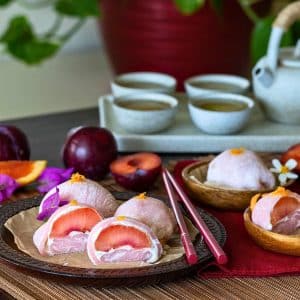
Mooncake Filling Ideas
Who says you can only fill mooncakes with lotus paste or sweet red bean paste. The only parameter is that the filling must be firm enough to roll into a ball. Here are some alternative ideas…
- Ground black sesame seeds with honey and coconut rolled into balls.
- Mung bean paste
- Chocolate espresso fig balls
- Ice cream - scoop it into small balls and freeze. You will have to work very quickly as it melts fast.
- Custard filling
- Cheesecake
- Sweet potato
- Pumpkin
- And the list goes on…
What to share with mooncakes?
Say hello to your favorite teatime snack! Mooncakes are perfect with endless cups of your favorite hot tea, latte, or bubble tea or hot apple cider.
Spice up the Mid-Autumn gathering by decorating your serving table with apple pecan mooncakes or a side of apple potstickers with a delicious caramel sauce. Add a few "round fruits" like sliced mandarin oranges, grapes, or Asian pears to complete the family and friend gathering. Warm up with a steamy bowl of black sesame dessert soup on the side.
Balance out the flavors with a few savory offerings like roasted nuts or pumpkin seeds for an easy side dish.
Frequently Asked Questions (FAQ's)
Both Japanese mochi and snow skin mooncakes are similar. They are both lightly sweet, soft, and chewy Asian desserts, often featuring similar types of fillings. However, their resemblances end there, as their skin compositions diverge. Japanese mochi relies solely on glutinous rice flour and potato starch, omitting milk or oil, resulting in a softer and more pliable texture. On the other hand, snow skin mooncakes incorporate not only glutinous rice flour and potato or cornstarch, but also plain rice flour, milk, and oil. These added ingredients in the snowy mooncake make them a little sturdier allowing them to be pressed into a mooncake mold for a decorative design.
Yes, snow skin mooncakes need to stay refrigerated and covered in a sealed container for up to 24 hours to keep their soft and chewy texture. Then, they can be stored in the freezer for up to 2 months. Do not leave snowy mooncakes out of the refrigerator for longer than 2 hours as this will cause them to have a dry texture.
Depending on the type of filling used, frozen snow skinned mooncakes can be thawed by placing them at room temperature for about 15 minutes. If you are in a rush, you can microwave them on low power for 10 seconds. Then, add 5 seconds at a time if still frozen. Of course, if your mooncakes are filled with ice cream, they should be eaten frozen.
More Delicious Asian Treats
Happy Mid Autumn Festival to everyone!
中秋节快乐 (Zhōngqiū jié kuàilè)
Did You Like Our Recipe? Leave a ⭐⭐⭐⭐⭐ rating and/or a review in the comments section below. Your feedback is always appreciated! Follow us for more delicious recipes on Pinterest, Instagram, Twitter and Facebook! Don't forget to sign up for our email list for more free recipes.
Snow Skin Mooncake with Sweet Red Bean Paste
Equipment
- kitchen scale to weigh ingredients
- fine mesh strainer
- mooncake press or mold. 50-gram size (small)
Ingredients
Fillings
- 17.6 oz Fine Sweetened Red Bean Paste
azuki bean paste
Additions
- ⅓ cup glutinous rice flour
(also called sweet rice flour) - this ⅓ cup flour is ONLY used to prevent things from sticking. Do not include this in the moon cake skin dough recipe below.
Snowy Moon Cakes
- 50 grams glutinous rice flour
(or about ⅓ cup and a tablespoon) - 35 grams rice flour (or about ¼ cup and 1 teaspoon)
- 20 grams corn starch or potato starch
(or about 2 Tablespoons) - 40 grams powdered sugar (or about ⅓ cup and 1 Tablespoon)
- 180 grams coconut milk canned
Full Fat (or about ¾ cup) - We used the Thai Kitchen brand.
Optional Natural Coloring Ideas
- 1 teaspoon matcha (green Tea) powder
or to desired taste/color (OPTIONAL- to make your mooncake skins green color) - 1 teaspoon freeze dried strawberry powder or to desired taste/color (OPTIONAL-to give your moon cake skins a light pink color)
- 2 to 3 drops Ube extract or to desired taste/color OPTIONAL - to give your moon cake skins a light purple color)
Instructions
Prepare Mooncake Filling
- Roll your fine sweetened red bean paste into about 28-gram balls or 1 heaping tablespoon (16 sweet red bean balls). Place on a plate, uncovered and freeze for about 30 minutes (or longer if you wish up to 24 hours in advance).
- Add ⅓ cup of glutinous rice flour in a dry pan. Cook over low medium heat. Stir until it turns a light yellow color. Remove the cooked glutinous rice flour from the pan and allow to cool. Set aside (This glutinous rice flour will be used to prevent things from sticking such as on your rolling pin, your board and in your moon cake press) We cook the glutinous rice flour to remove that raw flour taste.
Make the Mooncake Skins (Dough)
- In a medium microwavable bowl, add 50 grams of glutinous rice flour, 35 grams of rice flour, 20 grams of corn starch or potato starch, 40 grams of powdered sugar, 180 grams of canned coconut milk,
- Do you want to add color? (Optional Ideas)Green - 1 teaspoon of matcha green tea powder or 2 to 3 drops of pandan extract Pink - 1 teaspoon of dehydrated strawberry powder or beet powderPurple - 2 to 3 drop of Ube extractBrown - 1 teaspoon of cocoa powder
- Stir well. Next, strain this mixture through a strainer to get rid of any little lumps.
- Cover your mooncake mixture very lightly with a little plastic wrap. Set the microwave on regular high heat and cook for 30 seconds. Be careful the bowl will be hot. Take the mixture out of the microwave and stir well.
- Place the mixture back in the microwave, cover back up with plastic wrap and cook for another 30 seconds. Remove to stir well again and put it back in the microwave for 4 more sessions of 30 seconds, for a total cooking time in the microwave of 3 minutes. Take your moon cake skin mixture out of the microwave oven and stir. The mixture will be done when it goes from opaque to translucent in appearance. (If you decide to split the batch in half to add 2 different colors, they will only need a total of around 2 minutes each to be translucent.)
- Set the cooked mooncake dough aside and allow to cool. To expedite the cooling process, place moon cake skin mixture in the refrigerator.
Mooncake Assembly Instructions
- Remove the sweetened red bean filling balls from the freezer.
- Use a tiny amount of the cooked sweet glutinous rice flour to prevent the dough from sticking to your board.
- Knead your mooncake skin dough for about 5 minutes until smooth in texture. Your dough will be slightly sticky and little oily. Next roll the dough into a ball. Take your ball and roll into one long rope about 1 inch in diameter. Next cut your rope in half, and then in half again and each section in 4 pieces for a total of 16 pieces.
- Take one of the moon cake skin pieces and roll into a ball. Then with your fingers flatten slightly. Use a small rolling pin and roll out to about 3 inch diameter circle (give or take).
- Place one of your pre-frozen balls of sweetened red bean paste and place in the center of your moon cake skin rolled out circles. First, pull the moon cake skin over the ball of sweetened bean paste and crimp together and do this on all edges so that the frozen ball of sweetened red bean paste is fully covered with the moon cake skin.
- Our moon cake molds/press is the 50-gram size. We love the little, tiny one as they are the perfect little bite for a treat. Assemble your moon cake press per the manufacturers guidelines. Choose the pretty press design of choice and install into press. With ours you just place the little stamp inside and turn right to lock in place. Check your directions for your particular press as they are all different. Flour your moon cake press very lightly with with your pan fried cooked glutinous rice flour.
- Place the smooth side (good side) down into the decorated press and the crimped side (ugly side) facing outward. Hold your fingers on the bottom so your moon cake does not fall out and flip over so that the moon cake press is upright. With gentle but firm pressure, hold the press down to make the pretty design on the moon cake. Gently remove the moon cake from the press. Repeat this process for the remaining 15 moon cake skins and filling.
- Enjoy!
Video
Notes
- Weigh your ingredients! Try not to use the measuring technique as this is not as reliable.
- Wearing gloves is helpful when working with a sticky mochi consistency dough.
- Use as little of the cooked glutinous rice flour or cornstarch as possible to prevent sticking. If you use too much, it can take away from the aesthetic beauty of the mooncake design.
- Full fat coconut milk is best for this recipe. It provides the flavor and the essential oils to keep the mooncake skin soft and supple.
- Keep the center thicker than the edges, when rolling out the mooncake dough. This helps keep the shape of the mooncake.
- Use a small 50-gram mooncake stamp to keep portion sizes under control or cut into wedges to share. This size stamp will make 16 mooncakes.
Nutrition


Michelle says
Beautiful snowy moon cakes! One of our favourites, and I just happen to have the 50 gram mold too! Love mooncake season 🙂
HWC Magazine says
Thanks so much Michelle! Red bean paste is one of our favorite fillings too. Happy Mid-Autumn Festival a little early.
Valentina says
These are so fun, so pretty, and you make them approachable. I will definitely try them -- it would be a really fun weekend dessert project, and one of my sons is gluten-free, so they're perfect for him. 🙂 ~Valentina
HWC Magazine says
Thanks so much Valentina! So happy to hear that you like this simple and easy snow skin mooncake recipe. We originally learned how to make these in Hong Kong with the long steaming method. So, I was determined to update the old fashion recipe to make it easier, gluten-free and vegan. I think we have a winner- the microwave comes to the rescue.