Daikon Bacon Radish Cake
Grab a slice of our pan-fried meat lovers Daikon Bacon Radish Cake for a delicious East meets west dim sum treat. Its a MEAT LOVERS delight!
Servings: 16 radish cakes
Calories: 126kcal
Equipment
- scale to weigh ingredients
- steamer or a make shift steamer from what you have at home. Instructions for this below.
- 9 inch cake pan or 8 x 8 square pan okay too
- parchment paper to line pan
Ingredients
- 5 dried mushrooms
OPTIONAL- soaked in boiled water for 30 minutes and finely chopped (shiitake). Reserve the liquid from soaking the mushrooms for cake batter. - 10 grams dried shrimp OPTIONAL - soaked in hot water for 30 minutes, drained and finely chopped or about ¼ cup chopped.
Cook Daikon Radish
- 900 grams diakon radish
peeled and grated - 1 cup water REMINDER: Reserve the juice of the cooked daikon for the cake batter.
Stir Fry Bacon and Aromatics
- 150 grams bacon uncured or whatever type you desire-finely chopped
- 3 cloves garlic peeled and chopped
- 2 green onions chopped
Season the Cooked Daikon
- 2 teaspoons chicken powder or can use crushed bouillon cube
- 1 tablespoon sugar
or sugar alternative or LESS to taste. It depends on how strong your daikon radish is. - white pepper
to taste
Savory Cake Batter
- 180 grams rice flour
- 55 grams cornstarch
- 2 cups saved mushroom and/or daikon broth or water or as needed to make 2 cups liquid wet ingredients. The goal consistency is thick oatmeal. You may not need all 2 cups to reach this consistency.
Steaming
- cooking spray or oil for cake pan to prevent sticking
- water for steaming
Pan Frying
- 2 tablespoons oil for pan frying
Zippy Dipping Sauce - optional
- 4 tablespoons soy sauce or tamari to keep gluten free
- 2 teaspoons Chinese black vinegar
- 1 clove garlic peeled and minced
- 1 teaspoon fresh ginger grated or ¼ teaspoon dried ground ginger
- 1 chili pepper or a dash of dried red chili flakes - optional
Instructions
Preparations
- OPTIONAL: Soak the dried mushrooms and dried shrimp in boiled water until softened. (If using mushrooms, save the soaking liquid the mushrooms were in as you will use this later for the batter.) Drain and then chop finely. Set aside.
Cook Daikon Radish
- Put the peeled and shredded daikon radish and water in a wok or pan, cover and cook for about 5 to 10 minutes. The radish will go from white to slightly translucent and it will be tender. Strain the daikon radish well with a colander. REMINDER: Reserve the daikon juice as you can used this in the cake batter later. If you forget, no worries, you can replace with water instead.
Stir Fry Bacon Mixture while Daikon is Cooking
- In a frying pan, add bacon. Cook until the fat has rendered out and its crispy. Drain all bacon fat except 1 tablespoon. Over low to medium heat, add in the OPTIONAL chopped shrimp and mushrooms, or not. These 2 ingredients are optional but very delicious. Then, add in chopped garlic and spring onions and cook until aromatic. Remove from burner and cool. Set aside.
Make Radish Cake
- Place the cooked daikon radish back into your wok or pan. Season with chicken bouillon powder, sugar and white pepper. Adjust seasoning as required. If you want it more savory, add a little salt or chicken bouillon powder to taste. Like it more spicy? Then, add more white pepper. If your daikon is really strong, then add a little more sugar to mellow out the taste or less if it is not.
- WET INGREDIENTS: Measure out the reserved liquids from cooking the daikon and from the mushrooms soaking. If it does not equal 2 cups then add water to level it up to 2 cups. (If you do not like a strong daikon flavor, replace with water. However, we think it makes it extra delicious.) You can use the mushroom soaking liquid only instead or just plain water too. However, the liquid measured should equal 2 cups. Set aside.
- DRY INGREDIENTS: Stir the dry cornstarch with the dry rice flour together and set aside. Please weigh your ingredients as your cup and our cups are different.
- Place the seasoned cooked daikon on the stovetop on very low heat. Slowly add a tablespoon or two of the DRY MIXTURE (rice flour and cornstarch) a little at a time, to the seasoned daikon mixture, stirring continuously. Then add a little of the WET MIXTURE (mushroom juice/daikon juice/water) about ⅛th to ¼ cup at a time stirring well between each addition. You will continue this process until you have added ALL of the DRY MIXTURE. You may or may not need to add all of the WET MIXTURE. This depends on environmental factors like humidity, how well you drained your daikon radish, etc. The consistency you are looking for is thick oatmeal. Don't let the mixture burn.
- Turn the burner off. Add the BACON and aromatics mixture to the daikon cake batter and mix well.
Steaming
- Determine what size cake pan will fit into your steamer device. Assess your steamer device or your ability to make a steaming device with the equipment you have on hand. We were able to fit an 8 x 8 or a 9 x 9 round cake pan in a traditional steamer. These cake pans also fit in our wok, elevated plate with lid steamer method. (If your steamer is small, divide the daikon batter into 2 smaller loaf pans)
- Spray or grease cake pan on the bottom and all sides. Then, cut out a piece of parchment paper and lay on the bottom of the cake pan.
- Scoop the batter into your prepared cake pan and level it out until smooth. Place your meat lovers daikon cake in the steamer.
- Do not worry if you do not have a "big fancy steamer". You can use your wok. Place 2 chopsticks at the bottom of your wok in an "x" formation. Then, place a small plate of top. Carefully add water to the bottom of your wok about 2 inches or so on the bottom. Then, place your daikon cake dish on top of plate. Place a lid on top of your wok and steam.
- Alternatively, if you do not have a wok, there is always plan B for steaming.I use my big soup pot that has a lid. It is very deep but not very wide so I have to split my daikon batter into 3 smaller oven proof round dishes. I place a very small oven proof round bowl upside down on the bottom of my soup pot (ramekin works good). Then, I plate a small plate on top of the little ramekin bowl. On top of that, I place my smaller daikon cakes pans. The weight of the daikon cake holds down the upside down bowl. Then, I carefully pour my water inside my soup pot about 2 inches on the bottom, without getting any on my daikon radish cakes. I, then, place a lid on my soup pot to cover and steam the radish cake. Give it a try if you do not have a wok.
- Steam over high heat covered for approximately 55 minutes to 1 hour or until a toothpick or chopstick comes out clean.
- Allow cake to cool until room temperature and then place in the refrigerator overnight.
- Run a knife along the edges of the cooled Bacon radish cake. Turn cake pan upside down on a cutting board. Tap pan to allow the cake to be removed. Remove the parchment paper from the cake and discard. Cut cake into slices. (FYI- Wet your knife and wipe your knife between each and every slice for best results.)
- Put a little cooking oil in an iron skillet or frying pan and turn heat on medium high. Brown the daikon cakes slightly for a couple of minutes on both sides or until golden brown.
Zippy Dipping Sauce
- In a little bowl add soy sauce, Chinese black vinegar, garlic, ginger and optional chilis. Stir well.
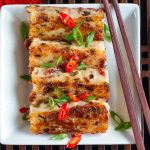
- Serve Daikon Bacon Radish Cakes hot off the skillet with zippy dipping sauce, Sriracha sauce or our Homemade Garlic Chili Sauce and enjoy!
Notes
To make i easier to slice the steamed and cooled radish cake, be sure to wet and clean your knife between each slice for best results.
Pan-fried radish cakes are best enjoyed hot off the skillet.
Steamed cakes can be refrigerated for up to 3 days. Sliced steamed radish cakes can be stored in parchment paper and frozen for up to 2 months.
Frozen steamed radish cakes can be pan-seared directly from the freezer but take a little longer to cook. Cook frozen radish cakes on a medium heat for about 3 to 4 minutes on each side until golden brown on each side and crispy and hot all the way through.
Nutrition
Serving: 1slice | Calories: 126kcal | Carbohydrates: 16g | Protein: 2g | Fat: 6g | Saturated Fat: 1g | Polyunsaturated Fat: 1g | Monounsaturated Fat: 3g | Trans Fat: 1g | Cholesterol: 6mg | Sodium: 135mg | Potassium: 167mg | Fiber: 1g | Sugar: 2g | Vitamin A: 18IU | Vitamin C: 13mg | Calcium: 20mg | Iron: 1mg
