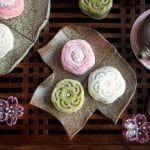
Snow Skin Mooncake with Sweet Red Bean Paste
Snow Skin Mooncakes are NO-BAKE moon shaped treats for sharing over Mid-Autumn Festival with "mochi like" skin and stuffed with sweet red bean paste.
Servings: 16 mooncakes
Calories: 100kcal
Equipment
- kitchen scale to weigh ingredients
- fine mesh strainer
- mooncake press or mold. 50-gram size (small)
Ingredients
Fillings
- 17.6 oz Fine Sweetened Red Bean Paste
azuki bean paste
Additions
- ⅓ cup glutinous rice flour
(also called sweet rice flour) - this ⅓ cup flour is ONLY used to prevent things from sticking. Do not include this in the moon cake skin dough recipe below.
Snowy Moon Cakes
- 50 grams glutinous rice flour
(or about ⅓ cup and a tablespoon) - 35 grams rice flour (or about ¼ cup and 1 teaspoon)
- 20 grams corn starch or potato starch
(or about 2 Tablespoons) - 40 grams powdered sugar (or about ⅓ cup and 1 Tablespoon)
- 180 grams coconut milk canned
Full Fat (or about ¾ cup) - We used the Thai Kitchen brand.
Optional Natural Coloring Ideas
- 1 teaspoon matcha (green Tea) powder
or to desired taste/color (OPTIONAL- to make your mooncake skins green color) - 1 teaspoon freeze dried strawberry powder or to desired taste/color (OPTIONAL-to give your moon cake skins a light pink color)
- 2 to 3 drops Ube extract or to desired taste/color OPTIONAL - to give your moon cake skins a light purple color)
Instructions
Prepare Mooncake Filling
- Roll your fine sweetened red bean paste into about 28-gram balls or 1 heaping tablespoon (16 sweet red bean balls). Place on a plate, uncovered and freeze for about 30 minutes (or longer if you wish up to 24 hours in advance).
- Add ⅓ cup of glutinous rice flour in a dry pan. Cook over low medium heat. Stir until it turns a light yellow color. Remove the cooked glutinous rice flour from the pan and allow to cool. Set aside (This glutinous rice flour will be used to prevent things from sticking such as on your rolling pin, your board and in your moon cake press) We cook the glutinous rice flour to remove that raw flour taste.
Make the Mooncake Skins (Dough)
- In a medium microwavable bowl, add 50 grams of glutinous rice flour, 35 grams of rice flour, 20 grams of corn starch or potato starch, 40 grams of powdered sugar, 180 grams of canned coconut milk,
- Do you want to add color? (Optional Ideas)Green - 1 teaspoon of matcha green tea powder or 2 to 3 drops of pandan extract Pink - 1 teaspoon of dehydrated strawberry powder or beet powderPurple - 2 to 3 drop of Ube extractBrown - 1 teaspoon of cocoa powder
- Stir well. Next, strain this mixture through a strainer to get rid of any little lumps.
- Cover your mooncake mixture very lightly with a little plastic wrap. Set the microwave on regular high heat and cook for 30 seconds. Be careful the bowl will be hot. Take the mixture out of the microwave and stir well.
- Place the mixture back in the microwave, cover back up with plastic wrap and cook for another 30 seconds. Remove to stir well again and put it back in the microwave for 4 more sessions of 30 seconds, for a total cooking time in the microwave of 3 minutes. Take your moon cake skin mixture out of the microwave oven and stir. The mixture will be done when it goes from opaque to translucent in appearance. (If you decide to split the batch in half to add 2 different colors, they will only need a total of around 2 minutes each to be translucent.)
- Set the cooked mooncake dough aside and allow to cool. To expedite the cooling process, place moon cake skin mixture in the refrigerator.
Mooncake Assembly Instructions
- Remove the sweetened red bean filling balls from the freezer.
- Use a tiny amount of the cooked sweet glutinous rice flour to prevent the dough from sticking to your board.
- Knead your mooncake skin dough for about 5 minutes until smooth in texture. Your dough will be slightly sticky and little oily. Next roll the dough into a ball. Take your ball and roll into one long rope about 1 inch in diameter. Next cut your rope in half, and then in half again and each section in 4 pieces for a total of 16 pieces.
- Take one of the moon cake skin pieces and roll into a ball. Then with your fingers flatten slightly. Use a small rolling pin and roll out to about 3 inch diameter circle (give or take).
- Place one of your pre-frozen balls of sweetened red bean paste and place in the center of your moon cake skin rolled out circles. First, pull the moon cake skin over the ball of sweetened bean paste and crimp together and do this on all edges so that the frozen ball of sweetened red bean paste is fully covered with the moon cake skin.
- Our moon cake molds/press is the 50-gram size. We love the little, tiny one as they are the perfect little bite for a treat. Assemble your moon cake press per the manufacturers guidelines. Choose the pretty press design of choice and install into press. With ours you just place the little stamp inside and turn right to lock in place. Check your directions for your particular press as they are all different. Flour your moon cake press very lightly with with your pan fried cooked glutinous rice flour.
- Place the smooth side (good side) down into the decorated press and the crimped side (ugly side) facing outward. Hold your fingers on the bottom so your moon cake does not fall out and flip over so that the moon cake press is upright. With gentle but firm pressure, hold the press down to make the pretty design on the moon cake. Gently remove the moon cake from the press. Repeat this process for the remaining 15 moon cake skins and filling.
- Enjoy!
Video
Notes
Recipe Tips
- Weigh your ingredients! Try not to use the measuring technique as this is not as reliable.
- Wearing gloves is helpful when working with a sticky mochi consistency dough.
- Use as little of the cooked glutinous rice flour or cornstarch as possible to prevent sticking. If you use too much, it can take away from the aesthetic beauty of the mooncake design.
- Full fat coconut milk is best for this recipe. It provides the flavor and the essential oils to keep the mooncake skin soft and supple.
- Keep the center thicker than the edges, when rolling out the mooncake dough. This helps keep the shape of the mooncake.
- Use a small 50-gram mooncake stamp to keep portion sizes under control or cut into wedges to share. This size stamp will make 16 mooncakes.
Nutrition
Serving: 1mooncake | Calories: 100kcal | Carbohydrates: 16g | Protein: 3g | Fat: 3g | Saturated Fat: 2g | Polyunsaturated Fat: 0.1g | Monounsaturated Fat: 0.2g | Sodium: 4mg | Potassium: 100mg | Fiber: 2g | Sugar: 3g | Vitamin C: 0.3mg | Calcium: 12mg | Iron: 1mg
