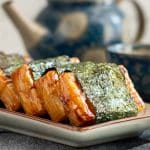
Isobeyaki Mochi
Discover how to make this umami packed sweet and savory snack Isobeyaki mochi at home. Toasty hot Japanese rice cake dipped in sweet soy sauce and rolled in nori.
Servings: 5 servings
Calories: 73kcal
Ingredients
- 5 Kirimochi (切り餅) plain dried cut mochi
- ¼ cup soy sauce or tamari sauce for gluten free option
- ¼ cup brown sugar
- 2 sheets dried nori leaves (roasted seaweed) 1 strip per Kirimochi (切り餅)
- cooking spray to prepare the baking pans
Instructions
Cook (4 Different Options)
- Option 1: Pan Frying - Spray a little light flavored oil in a non-stick pan. Pan fry the kirimochi on a medium low heat for about 3 to 5 minutes on each side or until golden and crisp on the outside and chewy in the middle.
- Option 2: Grilling or Grill Pan - Prep the grill or grill pan with a little oil to prevent sticking. Grill the kirimochi on medium heat for about 3 to 5 minutes each side or until golden and crisp on the outside and chewy in the middle.
- Option 3: Baking - Preheat oven to 375 degrees F (190 degrees C). Line baking sheet with parchment paper and/or a light oil spray to prevent sticking. Place the Kirimochi (切り餅) blocks on the prepared baking sheet. Bake for 10 minutes or until crisp on the outside and chewy on the inside. Turn the mochi cakes midway during the cooking process.
- Option 4: Air Frying - Preheat air fryer to 400 degrees F (204 degrees C) for 5 minutes. Prep the air fryer basket with a little oil to prevent sticking. Air fry kirimochi for about 4 to 6 minutes or until golden and crisp on the outside and chewy in the middle. Turn the mochi cakes midway during the cooking process.
Cut Nori (Dried Roasted Seaweed)
- Trim your nori (dried seaweed) sheets into 5 long strips. They should be slightly narrower than your kiri mochi cakes and be able to wrap around and overlap slightly so it can sealed. You will most likely need to cut the length as well so it not too long. (You will have some leftover nori and these are delicious in soups and salads)
Sweet Soy Sauce Glaze
- In the meantime, make the sweet soy sauce glaze in either a pan or in the microwave. Pan Method- Add soy sauce (or tamari) and brown sugar to a small non-stick pan. Cook and stir over medium heat until it starts to thicken - about 1- 2 minutes. Set asideMicrowave Method - Place soy sauce and brown sugar in a microwave safe bowl. Microwave in 30 second bursts for approximately 1 to 2 minutes. The sweet soy sauce glaze will thicken as it sets and cools slightly.
Wrap and Roll
- Immediately, brush the cooked kirimochi with the sweet soy sauce glaze and wrap up dried nori. Enjoy! Best served hot out of the oven.
Video
Notes
Storage
Only make as many isobeyaki mochi as you plan on eating at one sitting. Eat and enjoy the isobeyaki right after it is prepared for the ultimate treat. Delicious hot and toasty. If they get cold, the seasoned nori leaf will start to get soggy and the yaki mochi will start to harden back up.
Where to purchase
You can find both nori (dried roasted seaweed) and kirimochi (dried cut mochi - Japanese Rice Cakes) at Asian food stores or they can be purchased online on Amazon.
Recipe Tips
- The sweet and savory soy sauce will continue to thicken as it sits. Just heat up the soy sauce and brown sugar mixture just until it can coat the back of the spoon and then remove from heat.
- Using a brush to slather on the sweet and savory soy sauce mixture works well. You can also just spoon a little sauce on both sides.
- Get that pot or pan that you used to heat up the sweet soy soaking in hot water as soon as you are done using it for easier cleanup.
- Whether you pan fried mochi or grilled mochi, please use a medium to lower heat. The reason being is the inside of the mochi needs to get warm and soft inside before the outside gets overly brown.
- Every oven, air fryer, grill and stove top can vary in heat levels depending on the make and model. Do not use the time to cook the mochi as the only way to determine if the isobeyaki is done cooking. Instead, look to make sure that the mochi has started to puff up, turns golden brown or is crisp on the exterior and the mochi it should feel pliable.
- Don't cook too long the mochi or it will end up like a pool of molten lava. The goal is you want the edges to be crispy but the inside to be tender.
- Sometimes, the baking methods and the air fry methods do not get the cooking mochi brown. However, the exterior will be crisp and the interior with be chewy.
- If you want to amplify the flavors of the sea, you can heat up your nori leaves in a dry pan for a few seconds on each side before wrapping.
- If your yaki mochi is starting to get cold, it can be reheated in the microwave. Pop it in the microwave for 20 to 30 seconds BEFORE slathering in the sweet soy sauce and covering in the nori for best results.
Nutrition
Serving: 1isobeyaki mochi cake | Calories: 73kcal | Carbohydrates: 17g | Protein: 1g | Fat: 0.04g | Saturated Fat: 0.004g | Polyunsaturated Fat: 0.02g | Monounsaturated Fat: 0.01g | Sodium: 463mg | Potassium: 63mg | Fiber: 0.1g | Sugar: 11g | Vitamin A: 54IU | Vitamin C: 0.4mg | Calcium: 14mg | Iron: 0.3mg
