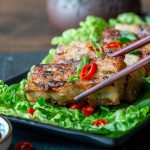
Vegan Chinese Radish Cake
Try our savory pan fried Vegan Chinese Radish Cakes (also known as turnip cake, white carrot cake, Lo Bak Go in Cantonese (蘿蔔糕) or Luo Bo Gao (萝卜糕) in Mandarin) for a delicious dim sum treat. This appetizer is super crispy on the outside and has tender Chinese five spiced daikon radish and mushrooms on the inside.
Servings: 16 Slices
Calories: 118kcal
Equipment
- scale to weigh ingredients
- steaming basket or a large pot with lid with an elevated plate inside (see post for details)
- 9 inch cake pan or 8 x 8 square pan okay too
- parchment paper to line pan
Ingredients
- 12 dried mushrooms soaked for at least 30 minutes in hot water and chopped finely. Discard the stems. Reserve the mushroom soaking water as you use this in the recipe.
Cook Shredded Diakon
- 900 grams daikon radish peeled and shredded (or about 2 pounds). You can also thinly julienne slice radish for a little extra texture, if desired.
- 1 cup water
to help soften the daikon (reserve the radish cooking water for making the cake)- 8 ounces
Fry up the Aromatics
- 2 tablespoons oil or less if you use a non-stick pan
- prepared chopped mushrooms from above
- 4 cloves garlic peeled and minced
- 4 green onions
chopped (white and green sections) - 2 teaspoons sesame oil
Seasoning for Cooked Radish
- 1.5 tablespoons Vegetable powder (Can substitute chicken powder if you are not vegan) Vegetable powder is the dried scoop-able version of vegetable bouillon. You can also use a vegetable bouillon cube and just crush and add to the recipe. We used a gluten- free brand to keep it gluten free.
- 1 tablespoon sugar
or sugar alternative to taste - salt to taste
- white pepper
to taste - 1.5 teaspoons Chinese five spice powder dried ground
Make Diakon Cake Batter
- cooked daikon radish from above Drain the daikon and reserve the juices
- 180 grams rice flour
only add a spoonful of rice flour and cornstarch mixture at a time to get to the correct texture consistency- we call this the soft cement consistency. - 55 grams cornstarch
- 2 cups reserved daikon juice and mushroom soaking water or as needed to create the consistency of thick oatmeal. We used 1 cup of reserved daikon water from cooking the radish and almost 1 cup of mushroom soaking water. Only add a small amount of liquid at a time along with the rice flour and cornstarch mixture. Little by little.
Steaming
- water for steaming (amount depends on steaming apparatus used)
Pan Frying
- 2 tablespoons oil for frying Vegan Radish Cakes
Chinese Dipping Sauce - optional
- 4 tablespoons soy sauce tamari sauce if need it to be gluten free
- 2 teaspoons Chinese black rice dark vinegar
- 1 clove garlic minced
- 1 teaspoon ginger fresh - grated
- 1 chili pepper minced - optional
Instructions
Prep Mushrooms
- Before you get started on the vegan dim sum recipe, soak mushrooms in hot water for at least 30 minutes to soften. Squeeze to remove extra liquid. Then remove stem and chop. (FYI- Make sure to reserve the liquid you soaked the mushrooms in as you will use this liquid later in the recipe) That is liquid GOLD!
Cook Daikon Radish
- In a large wok or pan, add shredded and/or Julienned sliced daikon radish and 1 cup water cook on high with a lid until softened. (about 5 to 10 minutes) The radish will change from being white and firm to lightly limp and translucent.
Sauté Mushroom Mixture while Daikon is Cooking
- In a separate pan, add in oil and chopped mushrooms and sauté for 2-3 minutes. Then, add in chopped garlic, green onions and sesame oil. Sauté 2 minutes or until aromatic and season with salt and white pepper to taste. Remove from heat and set aside.
Make Radish Cake
- Drain daikon radish in a strainer and press out the extra juice. Do NOT throw away this cooking liquid. Reserve this radish cooking liquid as you will use this later.
- Place the drained and cooked daikon back into the wok or large frying pan with the heat off. Season the cooked daikon with vegetable or chicken powder (vegetable bouillon cube crushed), sugar, salt, white pepper and five-spiced powder. All the water should be evaporated. Check the seasoning and add more salt or vegetable powder, if you want it more savory. Add more white pepper, if you like it more spicy. If your daikon is extra strong, add more sugar to taste. (FYI- every type of white radish has a little different flavor profile)
- Add the cornstarch to the rice flour in a bowl and mix well. This is the dry mixture for the cake. Set aside.In a separate bowl, add the mushroom soaking liquid from the dried mushrooms to the reserved diakon cooking liquid. You should have about 2 cups of liquid. If you do not have 2 cups of liquid, add a little more water to make 2 cups of total liquid. This is the wet mixture for the cake. Set aside.
- Place your Cooked and seasoned daikon radish mixture back on the stove burner and place on very low heat.
- Add a spoonful at a time of the rice flour and cornstarch DRY mixture with a couple of tablespoons of the reserved daikon water and mushroom water WET mixture a little at a time, to the daikon mixture, stirring continuously. Make sure it is well incorporated and has NO lumps. Repeat this procedure until all of the DRY mixture has been mixed in the cooked daikon with adding a little bit of the WET mixture. Stirring well with each addition. You may need all or a little less of the WET mixture to get to the desired consistency of thick oatmeal. A good parameter for checking the perfect consistency is to run your spatula at the bottom on the pan. If the daikon batter leaves a line on the bottom and starts to slowly return to the bottom of the pan. its perfect. Every daikon radish can be a little different as far as water content. In addition, your environment may be either more humid or dry. This procedure allows you to get the right consistency for your environment. We were taught this method in Hong Kong and it really is the best method. This procedure takes a few minutes but it is the best way to determine how much liquid is needed to het to the right wet cement consistency. We ended up using a total of 1 and ¾ cup of the WET mixture. You may need to add more or less.
- Turn the burner off. Stir in the aromatic sautéed Mushroom mixture to the diakon cake mixture.
- Either a 9 inch cake pan or 8 x 8 pan are both okay for this recipe. Oil your cake pan or square pan and line the bottom with parchment paper. Scoop the batter into the cake pan and level it and smooth out the batter. (If your steamer is small, divide diakon batter into 2 smaller pans)
- Do not worry if you do not have a "big fancy steamer". You can use your wok and place 2 chopsticks at the bottom of your wok in an "x" formation, then place a small plate of top, carefully add water to the bottom of your wok about 2 inches or so on the bottom, then place your daikon cake dish on top of plate and then place a lid on top of your wok and steam.
- Alternatively if you do not have a wok, there is always plan B for steaming. I use my big soup pot that has a lid. It is very deep but not very wide so I have to split my daikon batter into 3 smaller ovenproof round dishes. I place a very small oven proof round dish upside down on the bottom of my soup pot, then I place my small bowl or daikon batter on top of the upside bowl so the weight of it holds down the upside down bowl. Then I carefully pour my water inside my soup pot about 2 inches on the bottom without getting any on my daikon radish cake. I then place a lid on my soup pot to cover and steam the radish cake.
- Steam over high heat for approximately 55 minutes - 1 hour or until a toothpick or chopstick comes out clean. If your steamer lid has small holes or does not fit snug - now worries, just make sure to keep adding water to the steamer area so that your pan does not burn. Carefully remove steamed radish cake from the steamer and allow to cool to room temperature.
- Then place the cake to cool in the refrigerator overnight. This is best so it is easier to cut.
- Make your dipping sauce. In a small bowl add soy sauce (tamari), black Chinese vinegar, garlic, chili and freshly grated ginger, stir and set aside.
- Slice cake into slices about 16 to 18 per cake. (Be sure to have a glass of water and a towel near by as with each and every cut you will put your knife in the water and clean with the towel. This helps prevent sticking.) If you have a an iron skillet, this promotes the best char on the Chinese vegan radish cake. However, if you do not have an iron skillet, just use a non-stick skillet.Put a little cooking oil in your iron skillet or frying pan and place the sliced daikon cake into the frying pan. Brown the daikon cake lightly on both sides (about 2 minutes each side) until golden brown. Garnish with green onions and serve with dipping sauce, Sriracha or our Homemade Sichuan Garlic Chili Oil . Serve hot and enjoy!
Video
Notes
How to choose a good daikon radish?
Make sure the radish is firm and should not be easy to bend. It should look fresh and be crisp. Try to choose one that feels heavy for its size and is free on blemishes. If it still has leaves, they should be green. There should not be any signs of mold or feel slimy. If it does, the radish may have gone bad.
The secret to a tender radish cake!
Only add a little bit of the dry ingredients (rice flour and cornstarch) followed by a little of the wet ingredients (mushroom soaking liquid and cooked daikon juice) at a time to cooked and seasoned daikon. Be sure to stir well between each addition. Keep the stove top temperature set on a low heat. Just a little of each at a time. You will add all the dry ingredients, but you may have to add less or more of the wet ingredients to end up with a mixture about the consistency of oatmeal. When you push the spatula along the bottom of your pan it should leave a line but go back in a slow motion when it is the correct consistency. (Please watch the video below to see this in action)
How to Store
You may freeze vegan radish cake slices BEFORE frying them. Place parchment paper or waxed paper in between slices so they do not stick and place in a sealed container or sealed freezer safe baggie and store up to 2 months.
Then, when you are ready to eat just take them from the freezer to frying. They take a few more minutes in the pan to fry and sear when preparing them from frozen.
Pan fried Radish Cakes can be stored in the refrigerator for up to 3 days. Best reheated before serving.
How to steam
My favorite way to steam is to use my big soup pot with a lid. I put in an oven safe small bowl on the bottom upside down in the middle of the soup pan . Then, I set my Chinese vegan radish cake dish just on top of the upside bowl. It is pretty heavy so it will weight down the small upside down bowl. I then carefully add the water to the pan without getting any on the Chinese vegan radish cake. Put the lid on the big soup pan over the Chinese vegan radish cake and steam away.
Alternatively, I cross two chopsticks in a wok with a lid and make the letter "X", add water to your wok, put a plate over the chopsticks and your Chinese Vegan Radish cake on top of plate and lid on top of your wok and steam away.
You can also use a proper steaming basket.
How to Serve
Serve Vegan Chinese Radish Cake with hot tea and our dipping sauce, Sriracha sauce or our Homemade Sichuan Garlic Chili Oil.
Nutrition
Serving: 1slice | Calories: 118kcal | Carbohydrates: 17g | Protein: 2g | Fat: 5g | Saturated Fat: 1g | Polyunsaturated Fat: 1g | Monounsaturated Fat: 3g | Trans Fat: 1g | Sodium: 382mg | Potassium: 182mg | Fiber: 2g | Sugar: 3g | Vitamin A: 58IU | Vitamin C: 17mg | Calcium: 24mg | Iron: 1mg