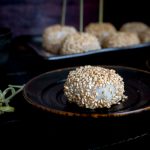
Mung Bean Daifuku Mochi
Mung Bean Daifuku Mochi is a delicious bite of spring with tender chewy Japanese mochi (pounded sticky rice flour) and sweet mung bean paste.
Servings: 12
Calories: 235kcal
Equipment
- Pressure cooker (Instant Pot)
- Microwave
Ingredients
Mung Bean Paste
- 200 grams mung beans
1 cup dried - 3 cups water
- 200 grams granulated sugar
1 cup - salt pinch
Mochi Ingredients
- 100 grams glutinous rice flour
¾ cup (sweet Rice Flour) - 180 ml water
¾ cup - 50 grams granulated sugar
¼ cup - 100 grams potato starch ½ cup (can substitute with corn starch)
- 1.5 cups mung bean paste
(or adzuki red bean paste if you prefer) recipe below - ½ cup sesame seeds
toasted - optional
Instructions
Mung Bean Paste
- Add 1 cup of green mung beans to 3 cups water and a dash of salt into the pressure cooker and seal. Set to high pressure for 5 minutes.
- Allow the pressure cooker to natural release for 10 minutes and then do a safe quick release.
- Drain any excess water. Allow the mung beans to cool- we popped ours in the freezer for a couple of minutes to expedite the cooling process. Add the cooked mung beans to the food processor along with the sugar and blend until smooth. Set aside.
Mochi
- Combine glutinous rice flour and sugar in a medium bowl.
- Add water to the flour and sugar mixture and mix well.
- Cover the bowl loosely with plastic wrap. Put the bowl in the microwave and heat it on high heat for 1 minute. Take it out and stir with spatula. Cover again and cook for 1 minute. Stir again, cover, and cook for 30 seconds to finish cooking. With each session in the microwave the mochi will get firmer and lighter in color.
- Put a piece of waxed paper/ parchment paper down on the counter and sprinkle it with ample potato starch to prevent the mochi from sticking. Cover the work surface with parchment paper dust it generously with potato starch. Transfer the mocha on to your potato starch dusted surface and then sprinkle more potato starch on top. Let it cool for about 5 minutes. (Immediately get that bowl soaking in warm water! You can thank us later that we reminded you to do that, unless you enjoy scrubbing dishes)
- Spread the mochi into a thin layer (about 1/16th of an inch) with a well potato starched rolling pin. (Mochi sticks to everything so make sure you dust everything including your hands with potato starch)
- Transfer the mochi with parchment paper onto a large baking sheet. Refrigerate for 15 minutes until the mochi is set. This makes it easier to cut and shape.
Assembly
- Remove the mochi from the refrigerator. Cut out circles with a circle cookie cutter. Our cookie cutter was 7.6 cm (3 inches)
- Dust off the excess potato starch with a brush. Place pieces of parchment paper/plastic wrap between mochi layers and stack them out of the way to finish rolling and cutting out the rest of your mochi. This recipe makes about 10-12 wrappers.
- If you wish to coat the outside of your Daifuku mochi with sesame seeds. Gently slightly dampen one side of the mocha wrapper with a small amount of water and then dip that side only into toasted sesame seeds. (You can skip this step if you want your daifuku mochi plain.
- Place one tablespoon of prepared mung bean bean paste (or adzuki red bean paste) into the center and plain skin side section of the mochi wrapper. Pinch the 2 edges together and then the other 2 edges together four corners of the mochi to cover the mung bean paste. Use your fingers to pinch the remaining mochi around the mung bean paste so that it is formed into a circle and no mung bean paste is showing.
- Put some potato starch on the sealed area and set aside just so that it does not stick. Repeat process for the remaining mung bean Daifuku mochi. Enjoy!
Storage
- You can store in the refrigerator for up to 2 days or freeze up to 1 month. We love Mung Bean Daifuku Mochi a little frozen. We just take out a few out of the freezer maybe 15 minutes before ready to serve and then they are perfectly delicious.
Notes
Recipe Tips for Preparing Mung Bean Daifuku Mochi…
- Mochi sticks to everything like your hands, rolling pins, board and utensils so dust everything well with potato starch so it does not stick.
- Soak anything that was used to prepare mochi immediately unless you enjoy scrubbing dishes. (You can thank us later)
- The microwave oven version of preparing mochi is about 100 times easier than the steaming method.
- Caution: The dish that you microwaved the mochi in gets hot. Use hot pads when transferring out of oven and pouring.
- Parchment paper is your friend when preparing mochi to prevent sticking.
- You can use a cup or anything round to cut the mochi into circles to prepare to stuff. We used round cookie cutters.
- Roll out the mochi about ⅛ inch thick. We do not like it too thick.
- Practice makes perfect so don’t be too hard on yourself with the first couple of ones you shape. The first couple Mung Bean Daifuku Mochi we usually eat- the bonus of being the cook.
- Keep your fingers well-floured in potato starch when shaping and pinching.
- We like to keep our mung bean dessert in the freezer because we have no self-control and don’t want to eat the whole batch in one sitting. We just take out a few for a couple of minutes when we are ready to enjoy.
Nutrition
Serving: 12g | Calories: 235kcal | Carbohydrates: 46g | Protein: 6g | Fat: 3g | Saturated Fat: 1g | Sodium: 12mg | Potassium: 327mg | Fiber: 4g | Sugar: 22g | Vitamin A: 19IU | Vitamin C: 1mg | Calcium: 90mg | Iron: 2mg