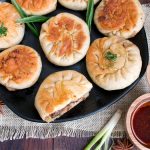
Spicy Pan Fried Beef Bao
Spicy Pan Fried Beef Bao is one delicious dim sum bite filled with tender ground beef, Sichuan Peppercorns, Five Spice and green onions in a delightful delicately pan fried beef bun. Gluten Free Recipe Options too!
Servings: 16
Calories: 152kcal
Ingredients
Traditional wheat dough recipe
- 1 cup Water 240 grams
- 1 teaspoon Sugar (granulated) or can use honey
- 1 teaspoon Yeast
dried - 3 cups Flour 360 grams (all purpose flour) (and a little extra for flouring your work surfaces)
- 1 teaspoon Salt
Gluten free dough recipe
- 1 cup Water
240 grams - 1 teaspoon Sugar (granulated) or can use honey
- 1 teaspoon Yeast
dried - 3 cups Rice flour 480 grams (and a little extra for flouring your work surfaces)
- 1 teaspoon Baking powder
- 1 teaspoon Salt
- 1 teaspoon Xanthum gum
Beef Filling
- 1 pound Beef
400 grams - 1 tablespoon Shaoxing wine (or dry cooking sherry)
- 4 Green onions
chopped or use garlic chives about ½ cup - 1-2 teaspoons Sesame oil
- 2 tablespoon Oyster sauce
(use gluten free if celiac issues) - 1 tablespoon Tamari sauce
(or can use soy sauce if no gluten issues) - 3 cloves Garlic
peeled and minced - 1 inch Ginger
knob peeled and grated (fresh) or 1 teaspoon dried - Salt and white pepper
to taste - 1 teaspoon 5 spiced powder
- 1 teaspoon Sichuan peppercorns ground (optional) to desired heat level
- 2 tablespoon Oil for pan frying light flavored oil of choice
Instructions
Make the Dough: Regular wheat dough Directions
- In a bowl add your lukewarm water and sugar or honey and mix well. Add your yeast to the sugared water mixture and allow the yeast to bubble and activate for about 10 minutes.
- Add your all purpose flour and salt to the yeast mixture and mix well. Once your dough starts to stick to itself, you can use your hands in the bowl to start to pull the dough mixture together.
- On a well floured work surface, place your dough and knead for about 5 minutes until smooth.
- Place your dough in a bowl (with a little flour dusted on the bottom to prevent sticking) and covered with a damp tea towel in a warm place for about 1.5 to 2 hours or until double in size. (Sometimes we turn on our oven on low and crack it open a little bit to keep our kitchens warm on those cooler days)
Make the Dough: Gluten-free rice flour directions
- In a bowl add your lukewarm water and sugar or honey and mix well. Add your yeast to the sugared water mixture and allow the yeast to bubble and activate for about 10 minutes. (Note there is more water to rice ratio as gluten-free flour needs to have more moisture so it does not crack)
- Add your rice flour, baking powder, salt and xanthum gum to the yeast mixture and mix well. Once your dough starts to stick to itself, you can use your hands in the bowl to start to pull the dough mixture together. (Note: Gluten free flour mixture is slightly stickier than the traditional wheat flour dough)
- On a “rice floured” work surface, place your dough and knead for about 5 minutes until smooth.
- Place your dough in a bowl (with a little “rice flour” dusted on the bottom to prevent sticking) and covered with a damp tea towel in a warm place for about 2.0 to 2.5 hours or until double in size. (Sometimes we turn on our oven on low and crack it open a little bit to keep our kitchens warm on those cooler days) Note: It takes longer for this gluten free rice dough to rise.
- In the meantime, make your beef filling. In a bowl add your beef, Shaoxing wine, green onions, sesame oil, oyster sauce, tamari (soy) sauce, garlic, ginger, salt and white pepper, 5 spiced powder and ground Sichuan peppercorns. Stir well and allow to marinate covered in the refrigerator while you are letting your dough rise.
- Flour your working surface (either all purpose flour if using the wheat recipe or rice flour if using the gluten-free recipe)
- Cut your dough in half. Roll each half into a log about 12 inches long and 2 cm in diameter. Cut each log in half and then cut each ½ log into 4 even slices. You will make a total of 16 slices.
- Roll each of the 16 slices into a ball. Cover the balls with a damp cloth while you are working on your other pieces to keep them from drying out.
- Flour your work surface and with the palm of your hand, flatten the ball. Then flour your rolling pin and roll out each ball into about a 3 in x 3 inch circle. Keep the center thicker than the sides.
- Hold the dough circle in your less dominant palm of your hand. Take about 1.5 tablespoons of your marinated beef and onion mixture and place into the center of your dough circle.
- With your more dominant hand take the edge of the dough and pinch it between your thumb and fore finger. Then use your middle finger to grab a small section of the edge of the dough and pinch together. Then move your fingers along the top of the edge of the dough to keep grabbing and pinching until all the dough is sealed. (See the video above) If you have extra dough on the top you can trim with scissors and then press down lightly with your fingers. Set your completed Spicy Pan Fried Beef Bao on a lightly floured surface.
- This process does not have to be perfect as you are going to be frying on each side. Your goal is to make sure that it is completely sealed and that the center is thicker than the edges and that you do not have any holes or air pockets so that the beef filling stays inside the bao during the cooking process.
- Complete this process with the rest of your dough balls. You should have 16 beef baos. Let rest 10 minutes before pan frying.
- In a large non-stick frying pan, add your cooking oil and bring up the oil temperature to a low medium heat. (VERY IMPORTANT- low medium or otherwise it will be brown but not cooked internally) You want it to be crispy on the sides and tender on the inside and cooked to perfection on the inside.
- Place your Spicy Pan Fried Beef Bao in the frying pan and cook about 3-4 minutes on each side over this low medium heat. We cook for the first 2 minutes uncovered to get a crispy bottom then the next 2 minutes it needs to be COVERED with a lid! Very important that it is covered as the covering provides a bit of internal steaming WITHOUT the addition of water. Dry Steam. We know it sounds odd but you just need to trust us on this , it works. Then, we flip over and then cook uncovered to brown the bottom half.
- Do not over fill your pan, less beef bao in your pans so they are not crowded.
- When your Spicy Pan Fried Beef Bao are close to being done, you will hear them start to hiss and this is because a little bit of the beef juices are beginning to be released into the pan. Get ready to remove the beef bao from the pan.
- You will know they are cooked to perfection when they are perfectly golden brown on both sides, the dough is tender on the inside and the beef is golden brown and savory on the inside. If your beef is still pink when you cut in half to test the first one then place in pan for a few more minutes to finish cooking.
- Enjoy hot of the griddle with a little tamari (soy), sesame oil, ginger and chili dipping sauce or just plain. Simply delicious!
Video
Notes
There are a couple of things we learned along the way making traditional wheat dough Spicy Pan Fried Beef Bao
1) Before working with yeast, check the expiration date. Yes, expired or close to being expired yeast will not rise.
2) You need to add just luke warm water, not too hot or too cold, or once again your dough will not rise. Too hot of water and you will kill the yeast. Too cool of water and your yeast will not activate.
3) Yeast needs a sugar source to activate such as sugar or honey. You can’t skip this step.
4) We like to turn on the oven and crack the door just a little bit to warm our kitchen and help our dough raise.
5) Keep your dough covered in bowl with a damp tea cloth over the top.
6) Keep your surface and rolling pin well-floured while rolling out dough.
7) Use a small rolling pin as you will need to get into tight quarters on a little 3 in x 3 inch circle. A special thank you to our dear friend Maggie, from Omnivores Cookbook who sent us a marble dim sum roller. You can find them on Amazon both wooden and marble. In a pinch, you can run up to your home depot or home center store and grab a round 2 cm Dowling cut in about 8 inches in length.
8) Do not over stuff your Spicy Pan Fried Beef Bao because your skin to your bao may tear.
9) Garlic chives rule however your easily accessible scallions or green onions are just as delicious in the beef filling.
10) Keep your dough balls covered with a damp towel while you are rolling out, stuffing and crimping the other beef bao you are working on. If you do not do this, then the skin will get crackly.
11) Let your stuffed Spicy Pan Fried Beef Bao rest for about 10 minutes before pan frying.
12) There is no need to steam and then pan fry. The moisture from the Spicy Pan Fried Beef Bao under a covered lid is enough to steam fry.
13) You need to cook about 3-4 minutes over low medium heat on both sides to get a nice sear and to cook the beef internally. We cover for a few minutes with a lid to help with the cook time. However, at the end of the cooking process again we take the cover off so that it gets crispy.
14) Your beef bao will start to hiss at the end of the cooking process as the beef juices are starting to escape. You are done! Keep a close eye on them so you do not over over brown or all the juices escape and cause your beef bao to break open.
15) The secret is this low medium heat. If you cook too high will brown too soon before cooked inside.
16) Serve right away while hot and delicious. We loved serving them with a little tamari, sesame oil, ginger and chili dipping sauce.
Now let’s touch on what is needed to make your Spicy Pan Fried Beef Bao gluten free and delicious.
1) Gluten-free bao need more water/moisture than the regular bao made with wheat flour.
2) We chose to use rice flour as that is a traditional flour used in Asia. Please note that your bao’s will be a little whiter or lighter in color compared to your wheat based bao’s.
3) We used 2 different kinds of raising agents to get our dough to rise. We used both yeast and baking powder.
4) It took between 2 and 2.5 hours for our gluten-free to double compared to our wheat bao which only took about 1.5 to 2 hours.
5) We tried many versions of this dough but we ended up needed the xanthum gum as a binder or otherwise dough is to crumbly after cooked.
6) You will need to make sure your surface is well floured for rolling your dough because this dough is stickier than regular dough.
7) Keeping the beef stuffing gluten-free is relatively easy. We use tamari sauce instead of soy sauce. We use the Gluten-Free Lee Kum Lee Panda Brand Green Labeled Oyster Flavored Sauce.
Nutrition
Serving: 1beef bao | Calories: 152kcal | Carbohydrates: 14g | Protein: 7g | Fat: 7g | Saturated Fat: 2g | Cholesterol: 18mg | Sodium: 288mg | Potassium: 110mg | Fiber: 1g | Sugar: 1g | Vitamin A: 30IU | Vitamin C: 1mg | Calcium: 12mg | Iron: 1mg